08. May 2010 · 2 comments · Categories: Uncategorized · Tags: ,

(Resubmitting to correct photo error)

From 2010 05 01 Hamburger Helper

So here it is.  This is the Chili-Cheese Hamburger Helper-like recipe that I stole from Suzanne McMinn’s blog “Chickens in the Road”.  About a woman who lives in rural West Virginia.

Like I said before, we grownups aren’t huge Hamburger Helper fans in the first place, but since our kids love it so much, we served this up and they enjoyed it just the same.  At least this time I felt better about what I was serving my kids.  Yes, I still served them up enriched macaroni (i.e., not whole grain pasta) but this time I know that I could control the sugar, salt, and I know that this dinner is trans-fat free (unlike Hamburger Helper)*.  Also, the homemade version included a teaspoon of sugar in the seasonings, which I prefer to the high fructose corn syrup in the boxed seasoning packet.

It was certainly less salty than the boxed version, and the kids noticed that, but Jacob still ate more than the adult servings Dave and I had.  Timmy did his usual: picked at the dish and only ate what we made him eat so he could have a dessert later.

In the future, I *could* incorporate whole wheat or veggie pasta, ground turkey instead of ground beef, and I’d like to try some of the other flavors.  I plan to make up a packet and take it on our camping trip in a couple weeks.  I look forward to attempting one of the Italian flavors.

*Note about the trans-fat.  The box of Hamburger Helper I had last week had “partially-hydrogenated soybean oil” on the ingredients list, yet on the Nutrition Facts label it indicated 0g of trans-fats.  This is misleading.  What the “0g” actually means is that there’s less than 1/2 a gram of the product in the package, so the company can round down.  It’s a math trick, that’s all.  There *IS* naturally-occuring trans-fats in beef and other red meats, but in trace amounts, and it hasn’t been proven to have the same harmful effects as the man-made trans-fats, which are produced to help shelf-stabilize foods with fat.

02. May 2010 · Comments Off on Hypothesis Successful! · Categories: Uncategorized · Tags: , , ,

Yesterday morning I posted about the Hamburger Helper we were planning for dinner. I predicted that our dinner would be a beef-based gravy and it turned out that’s exactly what we ended up with.

I know I had promised just a comment at the bottom of yesterday’s post about the outcome of the Hamburger Helper. But this was worth a separate blog post because of a suggestion from a friend (which I’ll mention below).

So here’s what we ended up with:

From 2010 05 01 Hamburger Helper

Howie’s vomit? No…”Beef Pasta” flavored Hamburger Helper.  Let’s show it nice and up close for you:

From 2010 05 01 Hamburger Helper

I don’t know about you, but I don’t find this appealing looking one bit. It tasted edible, and only Jacob liked it…I can’t believe I loved this stuff as a kid!  My hypothesis was correct in that the flavor of this dish was based on a creamy beef gravy. You add milk along with the browned beef and water. If you manage through the preservative-y saltiness, you can taste a beefy-type flavor.

Why is this a separate post? Because when I posted this picture to my Facebook page, one of my friends, who maintains a gluten-free household, brought this blog post to my attention. Homemade Hamburger Helper! Without the preservatives, sodium and other unpronouncable ingredients! Yay!

I was thinking that Hamburger Helper would make a good camping meal, so I’m looking forward to this alternative! Now, to choose a flavor, Suzanne made so many options!

18. April 2010 · 2 comments · Categories: Uncategorized · Tags: , , ,

So here we are at Costco, for our quarterly stock-up trip. We were almost out of the big ticket items that I usually stock in bulk: toilet tissue, coffee, dinner napkins, kitchen trashbags, bar soap, etc. As usual, we ended up with stuff we don’t need, like a case of Mexicoke. But I have to admit I did MUCH better than usual!

So I was walking down the snack aisle, issuing an endless stream of “No, Timmy!”s and “No, Jacob!”s at their endless stream of “Mother, can we have [insert crappy snack item here]?”. And we saw these chips. And dissolved into a flurry of giggles all at once!!! I think we all agreed: none of us want this!

O. M. G. What will they think of next???

02. April 2010 · 8 comments · Categories: Uncategorized · Tags: ,

I’m currently boiling eggs. I thought this would be a simple undertaking, getting the eggs in the fridge before dinnertime, so we can dye them after dinner tonight. It’s an Easter tradition…I did it every year as a kid, my boys have a good time with it and I look forward to seeing what creations we come up with this evening!

The sad thing, though, is that I’m the only one in the family who likes hard cooked eggs. This year I’m boiling 18 eggs and I’m thinking all along, “What the @#$%^ am I going to do with 18 hard-cooked eggs?” More precisely:

“What the @#$%^ am I going to do with 18 hard-cooked eggs before they go bad????” I can only tolerate but so much egg salad, and I don’t think my cholesterol count is going to appreciate me trying to eat 18 eggs in less than a week!

A bunch of us neighborhood stay-at-home Moms get together once a month for breakfast…it’s crossed my mind to just put a dozen of them in an Easter basket and present it for this week’s breakfast…except that they’d be rather old eggs by then.

This year, I decided I want to boil these eggs perfectly! This is the recipe I’ve elected to use this time around, and I think we have a winner! I’ve both overcooked and undercooked eggs. Most recently, I attempted Julia Child’s “Perfect Egg” recipe. Instead of sending you to a link, I’m going to put it right here, so everyone can see how complicated this is:

The Perfect Hard Boiled Egg

Recipe By : Julia Child, “The Way to Cook”
Serving Size : 1 Preparation Time :0:40
Categories : Cheese/Eggs Family Recipes

For 1-4 Eggs:
1 to 4 Eggs
2 quarts water — * see note

For 12 Eggs:
12 Eggs
3 1/2 quarts water — * see note

For 24 Eggs:
24 Eggs
6 quarts water — * see note

Special Equipment: High (not wide) Saucepan with cover, Bowl w/ice cubes & water (large enough to completely cover eggs)

*note: water should cover the eggs by 1 inch, so use a tall pan, and limit
cooking to 2 dozen eggs at a time.

1. Lay the eggs in the pan and add the amount of cold water specified. Set
over high heat and bring just to the boil; remove from heat, cover the pan,
and let sit exactly 17 minutes.

2. When the time is up, transfer the eggs to the bowl of ice cubes and
water. Chill for 2 minutes while bringing the cooking water to the boil
again. (This 2 minute chilling shrinks the body of the egg from the shell.)

3. Transfer the eggs (6 at a time only) to the boiling water, bring to the
boil again, and let boil for 10 seconds – this expands the shell from the
egg. Remove eggs, and place back into the ice water.

Chilling the eggs promptly after each step prevents that dark line from
forming, and if time allows, leave the eggs in the ice water after the last
step for 15 to 20 minutes. Chilled eggs are easier to peel, as well.

The peeled eggs will keep perfectly in the refrigerator, submerged in water
in an uncovered container, for 2 to 3 days.

So apparently when I cooked the eggs using Julia’s method, I messed something up, because I ended up with very difficult-to-peel eggs whose yolks were still liquid in the very center. Grosser than gross! I had only boiled 3 eggs to make a recipe of egg salad for a couple sandwiches, so at least it wasn’t a huge loss.

But Emeril’s recipe was spot-on! One of the eggs had a big crack when it was all done today, and when I peeled it, it was the most perfect yellow, with a shell that slipped right off…almost in one piece!

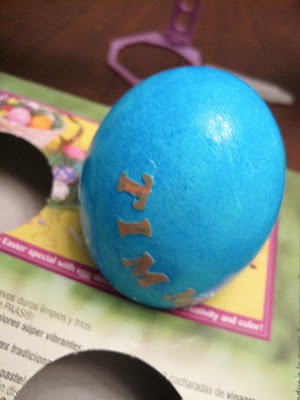
Anyway, enjoy a few pictures of our egg dyeing experience tonight.

From 2010 04 02 Dyeing Easter Eggs

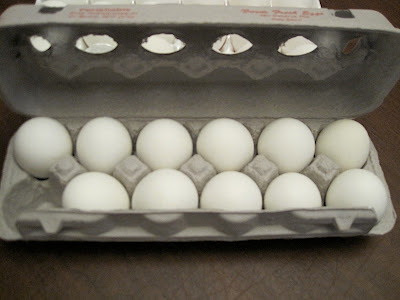
The eggs on the left, missing the Eggland’s Best “EB” stamp , are the hard-cooked ones. The stamp came off in the boiling water.

From 2010 04 02 Dyeing Easter Eggs

These eggs came from the organic pork farm right up the street from us. We buy our pork products from their little shop, which is only open on weekends. Last weekend, they offered a free dozen of eggs to folks who were buying their Easter hams. So these were free eggs 🙂

From 2010 04 02 Dyeing Easter Eggs

This is one of the railroads Dave features on his model railroad.

From 2010 04 02 Dyeing Easter Eggs

This is another railroad Dave features.

From 2010 04 02 Dyeing Easter Eggs
01. April 2010 · 2 comments · Categories: Uncategorized · Tags: ,

***A note about this picture. I just stole the picture because I think it’s funny. I checked out that website listed at the bottom and found that lawsuit they’re proposing a bit far-fetched. Just my opinion.

Dave was diagnosed this week with lactose intolerance. Without getting too much into the healthcare debate, this diagnosis was a long time coming…Dave’s been going through multiple referrals, tests and consultations since January. While his gall bladder surgery last September solved many of his problems, this issue emerged slowly this past winter, perhaps masked for some time by the other problems the gall bladder was causing.

This means looking at our family menu in a whole new light! Not only do we need to cut dairy foods from Dave’s diet, but we also need to be aware of the many sources of hidden lactose: baked goods made with milk, hot dogs that contain sodium lactase, cold cuts, cereal containing whey, etc. Oreo cookies, for example. I found this nice list as a starting point.

First off, we are switching our household’s milk. At first I was just switching our skim milk, from Land O’ Lakes to Lactaid Brand Fat Free Milk. Dave enjoys cereal in skim milk, and we each drink 8 oz. of skim milk with dinner every night. He also uses skim milk to cream his coffee in the morning. So the skim would definitely have to switch. The Lactaid milk is your standard skim milk, but with the lactase enzyme added, which breaks the lactose sugar down into two simple sugars: glucose and galactose. It tastes sweeter than we’re accustomed to, but definitely not bad at all.

I then realized that I should switch the 2% milk to Lactaid too. I prefer to cook with 2%, and my still-growing-like-weeds sons drink 6 oz. or so with breakfast and dinner every day. If I also switch the 2% milk, I can continue to use it to make pancakes, breads and mashed potatoes without problems for Dave. It’s going to cost more, about double actually, but that’s okay. I predict an extra $15-20 per month. One less trip out to eat.

Secondly, family meals now needs to have less dairy in its preparation. Probably a good call anyway, right? No more pizzas, lasagnas, enchiladas, pasta bakes, macaroni & cheese, and veggies with cheese sauce. I also need to keep tabs on butter used for things like mashed potatoes and pastries. We’ll be having more Asian stir fries, and traditional grilled meats, with a steamed vegetable and starch offering.

And finally, our ability to eat out at restaurants will take a big hit. This is definitely a good thing! I’ll get on these lazy streaks and want to just drop everything and go to a restaurant once or twice per week. BAD MAJOR MOM! I just did it on Sunday, I couldn’t get Outback Steakhouse off the brain, I hadn’t been in a very long time, and I convinced Dave that we should go. Mistake. It was expensive, and despite Dave’s best efforts, we think some lactose sneaked into dinner somehow — perhaps the bread? Or the Caesar salad dressing, even though it should be dairy free!

While at first I viewed this as an inconvenience, I had to stop for a second and think about my poor Dave. He has to watch his dairy intake with EVERYTHING now! Talk about inconvenient! He’s been advised to cut ALL lactose from his diet for the next several months in an attempt to heal his GI system, which has been very very stressed lately from all this.

I see a trip to our local-but-not-really-local Whole Foods Market to stock up on some lactose-free dairy products and dairy alternatives, such as Tofutti ice cream, and perhaps some soy cheeses. I’m hoping I can find other Lactaid products at Whole Foods, too, such as their evaporated milk.

09. March 2010 · 4 comments · Categories: Uncategorized · Tags: , ,

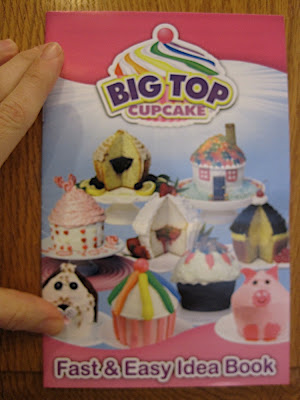
I’m currently in possession of a Big Top Cupcake pan.

From 2010 03 08 Big Top Cupcake

A giant cupacake. The ad claims it’s 25x larger than a standard cupcake, but I’m not sure what they’re using to measure that —

Math Time!

I put about 1/4 cup of batter in a single little cupcake. For this cupcake, I used 4 cups of batter.

By my calculation, that’s a 16x larger cake than a standard cupcake. However, as you’ll see as I go through the pictures, I probably could have gotten away with up to 6 cups of batter, thus making a 24x larger cupcake. Then you have to trim a bunch off…so I personally think 25x is a stretch.

Our neighbor behind us, who I affectionately call “Dave the Neighbor”, posted some Facebook pictures this past Saturday of his son’s Big Top Cupcake creation from this past weekend. I commented about how cool that cake was, and we conversed some about the pan. I asked if I could borrow it sometime, and about 15 minutes later his son ran over with the pan. Quick service!

I rifled through my pantry, looking for what ingredients I had on hand to use for a recipe with the cake pan. I found enough stuff to make a modified version of the Boston Cream Cake recipe in the book that comes with the pan:

– 1 box of yellow cake mix, plus the oil, 2 eggs and a carton of egg whites (for the equivalent of the third egg)
– Two packets of vanilla Jell-O singles
– Half a bag of Hershey’s MILK chocolate chips
– 1 can of condensed milk.

Hmmmm….most of the recipes call for about 1 1/2 boxes of cake mix, but I figured we can make do. As for the chocolate chips and condensed milk, I can combine those for a yummy chocolate pourable frosting.

So here we go…

Here are the pans. The apparatus at the bottom goes over the “bottom” pan to put a pocket on the top of the cake with which you can fill with icing, pudding, etc.

From 2010 03 08 Big Top Cupcake

And here’s the cake mix — nothing spectacular. Jacob will like yellow cake:

From 2010 03 08 Big Top Cupcake

Mix the ingredients together:

From 2010 03 08 Big Top Cupcake

This is what I use to grease my cake pans. It’s so easy to use, much easier than shortening and flour!

From 2010 03 08 Big Top Cupcake

So I messed up in forgetting to take pictures of me filling the pans, but the pan on the left is the bottom of the cupcake, while the pan on the right is the top. I wish I had put more batter in the top…and you’ll see why in a moment:

From 2010 03 08 Big Top Cupcake

I’m not completely sure that 350 degrees is appropriate to bake these — the edges got VERY brown, and the center was barely set. If I try this again, I should try it at 325 degrees.

From 2010 03 08 Big Top Cupcake

And then these huge cracks appeared:

From 2010 03 08 Big Top Cupcake

I have to admit, when I turned out the cakes, they didn’t look bad.

From 2010 03 08 Big Top Cupcake

But when I put the top onto the bottom, it seemed that the top of the cake could have been more substantial. That’s okay, it’ll still taste good.

From 2010 03 08 Big Top Cupcake

I used this Jell-O Singles shaker thing to mix up the two packets of vanilla pudding.

From 2010 03 08 Big Top Cupcake

Then I filled the pocket:

From 2010 03 08 Big Top Cupcake

Whaddya think?

From 2010 03 08 Big Top Cupcake

How about some chocolate icing? Using my poor girl’s double boiler, I mixed together 1/2 a can of condensed milk with what was left of my milk chocolate chips.

From 2010 03 08 Big Top Cupcake

This tastes JUST LIKE chocolate doughnut icing — YUM! I poured it on top of the cake:

From 2010 03 08 Big Top Cupcake

Uhhhhh….

From 2010 03 08 Big Top Cupcake

I had my boys laughing their heads off at this mess…

From 2010 03 08 Big Top Cupcake

Oh wait! Let me put a fork next to it so you can see how big it is!

From 2010 03 08 Big Top Cupcake

It cut pretty cleanly, and we all enjoyed a yummy dessert:

From 2010 03 08 Big Top Cupcake

There’s one happy Timmy!

From 2010 03 08 Big Top Cupcake

So do I love it or loathe it? I don’t know…neither. I’m glad I had a chance to try it out, and as it stands right now MAYBE I’ll buy one. Maybe I’ll get one as a gift? I currently have quite a repertoire of cake pans and there are several I haven’t used in years. Thank you Dave-the-Neighbor for letting us make a yummy dessert with your pan!

25. February 2010 · 6 comments · Categories: Uncategorized · Tags: ,

I’ve already spent enough time about this product. I analyzed how well it makes pancakes and waffles last month.

But I couldn’t believe when I saw this at our local Hy-Vee Grocery Store. For you local readers, I was at the Shadow Lake Hy-Vee.

From 2010 01 16 Batter Blaster WAFF-FAIL

“Okay, it’s a picture of that Batter Blaster stuff…so?”

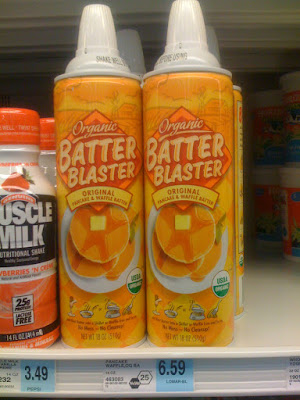
But look at that price!!!! For a can of batter? Really?

In most other ways, I really enjoy shopping at Hy-Vee. I’m reminded of the really nice Publix grocery stores in Viera and Suntree, FL. The store is spacious and there’s a wide variety of products.

Today I wandered into the Organic Foods section, in search of whole wheat pastry flour to make some Boot Track cookies. I then looked at the dairy section and saw the Batter Blaster there. For $6.59 a can. As mentioned in the first Batter Blaster blog post, I saw it at Super Target for $4.59, and I got my 3 cans for $2.97 at Costco.

That’s quite a price difference!

Why would the price be so high here? I wonder how much Hy-Vee paid for it? I think someone is milking that “organic” label on the front. Which leads me to a whole other discussion: Why does it cost so much to feed your family high quality foods???

Fresh fruit costs more than canned. Fresh cuts of beef costs more than frozen burgers. Fresh bread at the bakery costs more than a loaf of Wonder Bread. Organic ketchup costs more than Heinz.

What a racket….

23. January 2010 · 2 comments · Categories: Uncategorized · Tags: , , ,
From 2010 01 23 Timmy’s Mickey Mouse 5th Birthday Cake

This is Timmy’s birthday cake (duh!). Due to a series of unfortunate events, Timmy’s birthday was reduced to having a friend over for cake and ice cream after dinner tonight. We were planning a trip to the local indoor water park with the same friend, but we have some behavior issues earlier this month and Timmy lost that privilege. We may go later this winter, just not as a birthday thing.

I was thrilled that this cake was made with materials I had in the house already, from the cake mix and powdered sugar for the icing, to the colors and cake pans. The weather has been so absolutely lousy, I’ve only been heading out for essential errands, such as taking the boys to/from school and picking up groceries about every 4 days. Non-essential shopping trips and visits to the gym have dwindled down to a minimum.

Click on the link underneath picture to see the full album that covers some of the steps taken to make this cake.

20. January 2010 · 4 comments · Categories: Uncategorized · Tags: , , ,

As I said I’d planned to do in an earlier post, we attempted the Batter Blaster product to make waffles this past weekend. So here we go, the required supplies for morning waffles was nice and short. A waffle iron and the can of Batter Blaster!

From 2010 01 16 Batter Blaster WAFF-FAIL

(Actually, I have two waffle irons like this, I just got the 2nd one for Christmas).

So here we go — this is Dave putting the batter on the waffle iron in full Reddi Whip glory.

From 2010 01 16 Batter Blaster WAFF-FAIL

And after 3 minutes, this is what we got:

From 2010 01 16 Batter Blaster WAFF-FAIL

Sigh.

Very crispy:

From 2010 01 16 Batter Blaster WAFF-FAIL

So we figured, “Hey, perhaps we didn’t add enough batter…”

From 2010 01 16 Batter Blaster WAFF-FAIL

And THIS is what we got:

From 2010 01 16 Batter Blaster WAFF-FAIL

The camera lens steamed up and we got this lovely mess.

Really? When I add too much of my homemade waffle batter, I get a tall waffle — rather gooey — but I’d never experienced this volume of ooze before!

From 2010 01 16 Batter Blaster WAFF-FAIL

But this time we pulled the waffles off the iron nice and early…trimmed off the raw batter on the edges, and had something adequate (but not “great”) for the family to enjoy.

From 2010 01 16 Batter Blaster WAFF-FAIL

As for the overcooked ones, they were fine under a blanket of butter and Aunt Jemima.

From 2010 01 16 Batter Blaster WAFF-FAIL

Happy Breakfast!

13. January 2010 · 4 comments · Categories: Uncategorized · Tags: , , ,

I was at Costco on Tuesday, mainly to pick up some laundry detergent, but as usual, I was sucked in to buying other things I didn’t need.

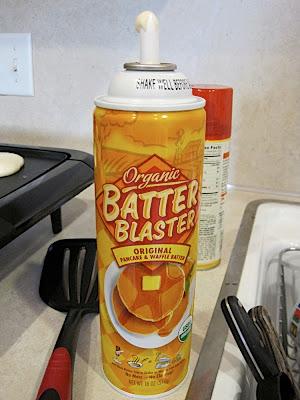
Such as this:

From 2010 01 13 Batter Blaster Pancakes

The product even has a cute little jingle. Turn up your speakers and give it a listen when this web site opens.

Anyway, I first saw this about 2 weeks ago at a trip to Super Target. It was $4.59 for one can. I thought to myself, “That’s the cost of 4 batches of homemade pancakes in my house!”, and left it alone.

But at Costco on Tuesday, there was a THREE PACK for $2.97. Really? Well golly! How could I refuse that? So I picked up a three pack.

This morning I made them for Timmy and me for breakfast. I’ll bypass the suspense and say that these pancakes weren’t bad, but they clearly weren’t homemade.

Enjoy some closeups of the can:

From 2010 01 13 Batter Blaster Pancakes

It’s even ORGANIC!

From 2010 01 13 Batter Blaster Pancakes

According to the directions, it’s just point and shoot onto a skillet or frying pan. They recommend a 400F degree surface, but I don’t. I played it safe and kept my electric skillet at 375F.

The initial presentation is quite shocking…although the can looks like Reddi Whip, I didn’t expect the batter to come out looking just like Reddi Whip!

From 2010 01 13 Batter Blaster Pancakes

After about 10 seconds, the batter will spread out, so be sure to account for this.

From 2010 01 13 Batter Blaster Pancakes

From 2010 01 13 Batter Blaster Pancakes

So on my 375F skillet surface, it didn’t take long for these pancakes to over brown. I didn’t get the tell tale bubbles, and it was tough to tell if the edges were cooking well…so upon first flip, this is what I was greeted with.

From 2010 01 13 Batter Blaster Pancakes

The flavor isn’t bad, it’s slightly sweet, which is how we prefer our pancakes here, but there’s a tell tale ever-so-slight chemical flavor that sends alarm bells through my head that this is NOT homemade. As for texture, these are flatter pancakes than I’m used to making, and they seemed to get leathery in a hurry if we didn’t eat them right away. I couldn’t cut them with a butter knife, and had to break out my kitchen shears to cut up Timmy’s.

But Timmy didn’t mind — he had 4 of them for breakfast!

From 2010 01 13 Batter Blaster Pancakes

One more thing, this product is also supposed to work on a waffle iron. I’ll have to try it later this week.

In conclusion, I will use the cans I have for the next several batches of pancakes and/or waffles (each can makes 28 4″ pancakes, so I’m guessing 18-20 6″ pancakes which is our preferred size). But that’s probably it. I have to admit it’s quicker and more convenient than beating the eggs and measuring out the flour and baking powder.