12. April 2011 · Comments Off on Canning 101: Or "Jam Tomorrow, Jam Yesterday, But Never Ever Jam Today!" · Categories: Uncategorized · Tags: , ,

* Name that tune!

Oh, never mind!  Here’s the whole song, just for you!  This Carol Channing act sent my sister and me into a flurry of giggle when we were little.  Prepared to have it stuck in your head for a while, ha ha!

With all those strawberries I brought home on Monday, I had to get cracking to make some of the freshest strawberry jam EVER!  For the first time since 2007, I dug out my canning supplies.

“As if you don’t do enough…you do canning?”

YES!  I remember my Mom doing it when I was a kid, and it turns out canning your own food is easy, inexpensive, and incredibly nutritious!  It’s great knowing what’s in your food!

I bought my hardware in summer 2001 when we grew so many tomatoes, I was able to preserve several jars of whole tomatoes, along with several jars of homemade pasta sauce.  I’ve used it off and on in Ohio, Florida (2002-2005) and North Carolina, but then the equipment sat dormant while we were in Nebraska.

How does canning work?

Like everything else I blog about, a little science/history lesson is in order.  According to the authority on everything, Wikipedia, home canning is the process of preserving foods by putting them in jars and heating them to kill organisms that might cause the food to spoil.  I mainly stick to the easy-to-preserve foods (strawberries and tomatoes), and I’m now comfortable enough with the process that I’d like to delve into the more challenging foods soon, such as corn and peppers.

When foods have a pH of lower than 4.6, you can effectively kill the microorganisms by simply boiling the food at 212 degrees F for a specified period of time.  This is why preserving tomatoes, berries, and pickles is so easy.  And the hardware is inexpensive.

On the other hand, if you’re interested in preserving meats or low acid vegetables (such as corn and non-pickled peppers), you need to boil the food at a HIGHER temperature than is possible by simply boiling.  Perhaps you’re wondering, “How is this possible?”  Easy: you need a pressure cooker!  A pressure cooker, which allows the air pressure inside the vessel to increase as you heat it, the boiling point of the liquid can increase over 250 degrees F!  WOW, how cool is that?  Now, you can boil the canned foods at a high enough temperature to kill even the Clostridium botulinum spores, which can’t live in temperatures higher than 240 degrees!

As I’ll discuss in the next section, venturing into the pressure canning world involves a more lofty investment in a quality pressure cooker, large enough to hold the jars.

What kind of equipment do I need?  And how much will this cost me?

If nothing else right now, get this book!  Or at least a version of this book, since it’s constantly being updated.  This is the one I have from 1999.  It offers easy guidance on what equipment you need, along with dozens of canning recipes — not just for the minimally prepared foods, but also for salsas, sauces, and assorted flavors of pickles.

The rest of the supplies can easily be found at your local Walmart.  Look in the kitchenwares section…sometimes it’ll be moved to a “seasonal” section when the tomatoes and other veggies are in full harvest.  You might or might not see the supplies at other discount department stores — in this area it’s been hit or miss at my local Target (they had salsa jars, which was cool, but that was it).

This is a “canner”.  Really…it’s just a really big pot.  If you have a large soup pot, it will do the same thing for you: hold boiling water.

This “canner” includes a nifty rack that helps you easily lift all the jars out of the pot at once.  This will hold seven jars.

I also got this “accessory pack”.  Over the years, I’ve come to only use the tongs and the funnel.  And honestly, I don’t even use the tongs all the time.  But the funnel is a lifesaver — and can be purchased separately for just $1-2!

$6.97 at your local discount department store.
My 11-year-old accessory set.

Jars, Lids and Bands.  For me this is the only recurring expense with canning…this is because I give away so many of my jams.  I lean towards the “quilted jelly jars”, which are half-pint (8 oz.) sizes, for jams and jellies.  You can get a dozen for about $9-10 at your local discount department store.  For my tomato products I look for the “wide mouth” quart-sized jars.  They take special lids and bands, but aren’t that hard to find.

Some terminology.  The “lid” is the solid round disc with the rubber gasket on the bottom.  The “band” is the threaded ring that really is only needed to hold the lid in place until it’s been vacuum sealed.  Some folks will remove the band before storage, but I prefer to keep it with the jar, helps to hold the unsealed lid on the jar when you’re storing it in the fridge.

Know that if you keep your jars, you can reuse them with the bands, and you simply need to buy new lids for $1-2 per dozen.

These lids have a special rubberized gasket that will form the seal on your jars.  They can only be used once, but the jars and bands can be used multiple times.

And finally, you’ll need the fruits or vegetables you’re planning to preserve.  If you’re making jam or jelly, you’ll want to buy some pectin, which is also found with the canning supplies at your local discount department store.  Pectin is a type of polysaccharide found in plants.  This is the ingredient that gels together jams and jellies, and is also found in natural intestinal remedies, such as fiber laxatives and stool softeners.

So let’s tally up the expenses for canning your own food:

  1. “Canner” or other large pot: $20
  2. Accessories: $7
  3. Jars, Lids, Bands: $10 per dozen
  4. Pectin: $1-2 per recipe’s worth
  5. The cost of whatever food you’re planning to preserve.
I’d say that for about $50 of up front cost, the cost of my family going out to dinner at Outback Steakhouse, you could lay the foundation for preserving foods with little-to-no chemicals.
OR: You could just hit this “Easy Button” here, which will hook you up for less than $45!

Canning 101: Classic Strawberry Jam

So imagine tapping into some fresh fruit or vegetables that were preserved a mere SIX hours after picking them off the plant!  And that you know EXACTLY what’s in the jar.

In this case, I know that this strawberry jam has only strawberries, sugar and pectin.  Of course, this recipe I’m going to demonstrate has 7 cups of sugar in the 9 half-pints of jam, so it’s definitely NOT a low-calorie food.  I’m only attesting that it’s nice to know exactly what’s in the jar.

(Two days later I made jam with half the sugar — which required a different kind of pectin that promotes more gelling — but I haven’t tasted it).

So here we go.  Let’s start with our stash of strawberries.

No…wait.  Start with the canner pot, make sure it’s filled up about 2/3 full with water and get it boiling.  It’s a large pot and you won’t want to wait for that water to boil once the jars are ready to process.

Back to the berries.  Crush the berries. I have a potato masher with which I can do this.  Looks like serious strawberry carnage here, doesn’t it?

Put the pot on high heat and bring to a boil. If you’re using traditional pectin, just put in the contents of the box with the sugar called for in the recipe. In this recipe, it’s asking for SEVEN cups of sugar (oofta!). If you’re using “low sugar” or “sugar free” pectin, read the instructions about the possible additional ingredients to be added at this point.

Allow this to boil vigorously for the amount of time in the instructions. In this case, we boiled for about 5 minutes, and this allowed the pectin to gel. You might want to use this time to get your ladle, funnel, clean jars, bands and lids ready near the pot.

You need to work quickly at this point. Fill each jar with the jam to within 1/4-1/2″ of the top of the jar. DO NOT FILL TO THE VERY TOP! You need the space to account for possible expansion of the jam while you’re boiling the jars, as explained in this link.

Make sure the top edge is clean, then place a lid on top.

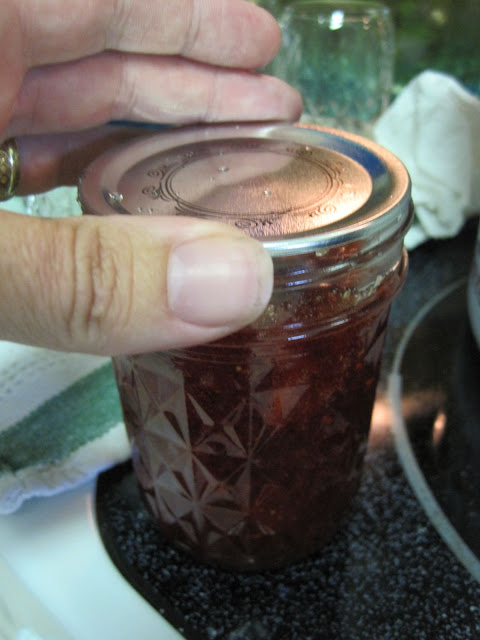
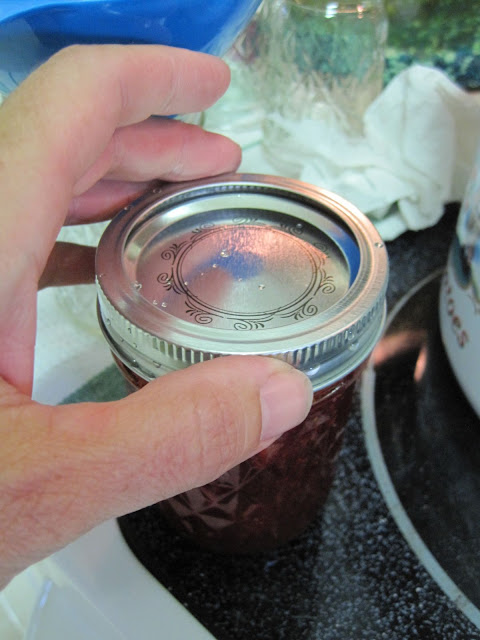
Follow it with a band, which doesn’t need to be closed super-tightly. Just tight enough that the lid won’t slide off. That tightness will loosen up while you’re processing the jars.

Now it’s time to get the jars into the canner, whose water should be boiling already.  I use a rack that makes it easy to lower/raise up to 7 jars.

After the requisite number of minutes of boiling (15 minutes in the case of the strawberry jam), pull out the jars and let them dry off/cool on a towel. Listen for the pop — that’s the sound of the lid “imploding”. You want to hear this pop once for each of the jars you have, it’s the proof that a vacuum seal was indeed formed and your jams are good to go for up to 12 months in the cupboard!

If you don’t hear the pop, and there’s still a flexing of the lid when you press down on it, then your jam isn’t sealed. In most cases, you can simply re-boil the jar again and try for that seal. If that doesn’t work, then pop it in the fridge where it’ll last you 7-10 days.

The finished product. Some might suggest you cool the jars upside-down, to help the berries distribute better throughout the jar. I didn’t do that here, so the berries sorta drifted up towards the top.

Recipes claim that you should let the jars sit for 24 hours before using, but I don’t see why. Warm jam on some toast (in this case, potato bread toast)! YUM!

06. April 2011 · Comments Off on Florida Discoveries 8.5*: Kayaking! · Categories: Uncategorized · Tags: , , , , ,

*I’ve had to do some re-numbering with my Florida Discoveries posts, so instead of re-numbering everything, I just stuck a “0.5” in there.

How many of you remember this video from Sesame Street?

For years and years and years this was my perception of kayaking.  Being sealed into this fiberglass tube-thingy as if you have no legs and navigating river rapids.  And of course being able to flip around like this guy (allegedly Jim Henson) does at the end.

Last week as a surprise for my sister and nephews, we borrowed a 2+ man ocean kayak from our friend/neighbor/former commander Mike D.  This is different than the traditional, competition kayak that I was more familiar with (but had never done).

I’d been canoeing many times — Girl Scouting, in college, in Louisiana on the Sabine River — but kayaking is somewhat different, and in many cases it was easier.

The first day we took the kayak out to Navarre Beach, we were mortified at how tall the waves were in the Gulf (it was chilly and windy), so we packed everything up and ran about 500′ across the parking lot to the Santa Rosa Sound side where things were much calmer!  We all took turns taking short trips out.

After my sister’s family left last weekend, we took a trip to the beach again, this time so Dave and the kids could try out the kayak.  The gulf side was nice and calm, and we all got a chance to paddle out towards the dolphins!

Here are pictures from our two kayaking trips.

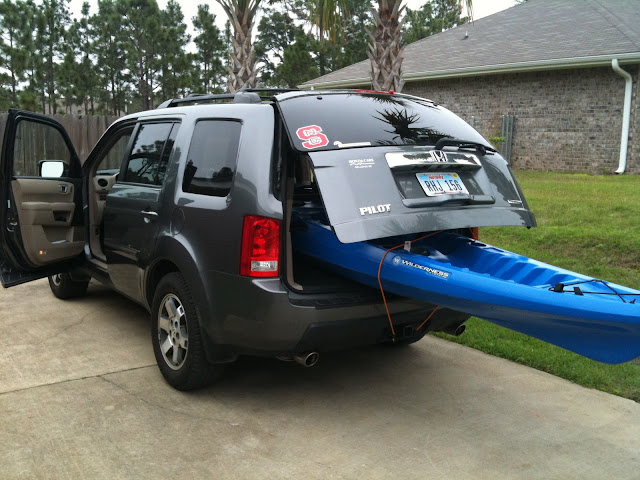
I believe it was a 130″ long kayak (just under 11′).  So here’s how it looked packed into our suddenly-small-looking SUV.  Luckily we were only transporting it about 5 miles, or 10 minutes drive.
More »
06. April 2011 · Comments Off on Florida Discoveries 8: Pretty Camellias · Categories: Uncategorized · Tags: , ,

Today I was in downtown Fort Walton Beach to pay a visit to the local running store. Between the parking lot and the store you walk through a pretty camellia garden. These variegated ones caught my attention.

Enjoy!  Click the picture to see it in better detail.

24. March 2011 · Comments Off on That Wisteria Book I Was Looking For…."The Floatplane Notebooks" · Categories: Uncategorized · Tags:

On the post I just wrote a few hours ago, I mentioned a book I had read several years ago that involved a very old wisteria, and how the author had personified it in several chapters.

In my crazy search for the book’s title (which mostly yielded references to ABC’s Desperate Housewives), I found this forum that people use to find names of books they’re trying to remember.  Part of the AbeBooks.com website.  I submitted a request, put in what I remembered about the plot and within 6 hours I had two replies.

Thanks to Anna on the forum, I now can share the information with you!

The book my book club read in 2006 was called The Floatplane Notebooks by Clyde Edgerton.  One of the reviewers compares the literary style to William Faulkner’s As I Lay Dying and they’re absolutely right!

24. January 2011 · Comments Off on From GeekMom: Star Wars Fail: Overpriced Cupcake Decorating Kit · Categories: Uncategorized · Tags:

Last weekend we were at our local mall-like-shopping-location. It isn’t really a mall, since it doesn’t have that old-school enclosed building thing going on. It’s one of those open-air places, where you walk outside between the pretty-people stores. Each of the past four locations we’ve lived has had one nearby. Most of you who live in suburban America know what I’m talking about, right?

We ventured into Williams-Sonoma — the lure of free samples usually attracts my boys. The thought of one day having a kitchen like in their catalogs attracts me. There was a lovely display of Star Wars-themed kitchen supplies. Of course we were attracted to the display like white on rice! The items were pretty neat, certain to make great gifts. There in the middle among the cookie cutters and pancake molds were these “cupcake decorating kits.”

Picture: Williams-Sonoma

My kids begged “Please? Please? Please?” for one of the kits, and since my youngest son is celebrating his sixth birthday this week and we had family in town, I caved in and let him choose the kit of his choice. I’m so glad he picked the Rebel Alliance kit instead of the Galactic Empire one. I thought the set was pretty cute, and at the time I didn’t think anything of paying $12 for it. How could I turn down classic Star Wars???

Tonight my mom and I made some cupcakes for dessert, using half of the baking cups and toothpicks.

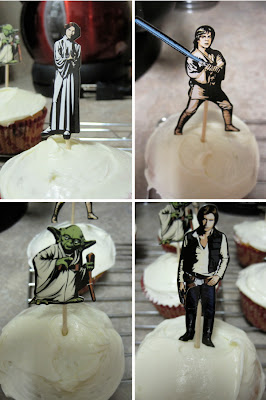
That’s what this kit is: baking cups and toothpicks. Probably about $1 worth of product, to be honest.

Photo: Patricia Vollmer

Close Ups of the Rebels. What do you think? Good likenesses? Wait a sec, is Luke relieving himself? Photo: Patricia Vollmer

We devoured the cupcakes and the used baking cups went right into the trash, but I made a point to insist that no one lick the toothpicks and I’m making sure to recycle them. The pictures on the toothpicks are made of a slightly-waxed paper. Not quite cardstock, but a little heavier than just plain paper.

My opinion? Twelve dollars for this kit is a considerable indulgence. My kids were smiling all evening from the cute toothpicks, and one could argue that doesn’t make this all a waste. If you aren’t picky about the baking cups — considering R2, C3PO and Chewie were all on the bottom of the finished cupcake where no one will really see them — you might be able to get away with making the toothpicks on your own.

Consider how many different characters you could glue to toothpicks and stick in cupcakes! Maybe this is what I’ll do for the Mario Brothers cake that’s been requested for the party next weekend.

Originally published on Wired.com’s GeekMom blog on 24 Jan 2011.

22. January 2011 · Comments Off on From GeekMom: Should We Dilute the Kool Aid? · Categories: Uncategorized · Tags:

Photo: Patricia Vollmer

When I was little, I remember my mom making Kool Aid.  I have pictures around of me wearing my token Kool Aid mustache.  I even had a Kool Aid t-shirt. I remember sometimes the Kool Aid would seem, well, watery.  Did my mom dilute it on purpose?  Boy, I hope she didn’t.  Sometimes, I wondered if she was sneakily reducing my sugar and artificial color.  I do remember telling myself that when I got older, I would never dilute the Kool Aid!

But guess what?  While I do my best to make the Kool Aid at home to the recipe, I have to admit I water down the kids’ lemonade and fruit punch at the fast-food restaurant beverage machines.  It’s just instinct, I WANT to dilute!

This diluting of the Kool Aid is now a metaphor I’ve been giving to the crime of watering down — or dumbing down — answers to the questions kids ask. JennT posted earlier this week about the incessant “Why? Why? Why?” questions she receives from her kids and in her line of work.  My kids do the same thing, and sometimes it grates my nerves for sure!  But sometimes embedded in all of the silly mindless “Why?”s is a jewel of a question that my sons are truly curious about.  And when my just-as-geeky-as-me husband or I hear such a question we want to stop and give it our full attention!

And if it’s a science or math question?  Stop EVERYTHING!  Break out the props!

My husband and I had a great professor in college who has a pet peeve about “bad meteorology” to the point he made up a website dedicated to debunking several of the most-basic of meteorology myths.  A quote he said that has stuck with my husband Dave all these years was “Be very careful what you put into kids’ heads because it’s very hard to get it out!”. Dave and I take this very seriously with our kids.

So when our sons ask a question like “Why is the sky blue?”, our approaches to the answer might be a little different than non-geek parents.   For a pair of meteorologists with offspring, we waited for that very question with bated breath, as if it were a milestone like learning to walk or ride a bike!

In our house, though, the question wasn’t “Why is the sky blue?”  It was “Why are sunsets red?”  We got it when our oldest son was about 6 1/2 years old.  Definitely a corollary to the dream question!  So I’m now going to share with you how we geek parents approached this subject.

Sunset over Lee-on-the-Solent, Great Britain. © Copyright Rebecca Altman and licensed for reuse under the Creative Commons License. http://www.geograph.org.uk/profile/1963

We started with rainbows.  Jacob knew the colors of the rainbow by this point, so it was easy to explain to him how red is at one end of the rainbow, and violet is at the other.

Then we discussed the electromagnetic spectrum.  Enter a basic diagram, with the shortwaves on the left, the longwaves on the right.  Jacob could name many of the parts of the electromagnetic spectrum, such as X-rays and microwave radiation.  We explained how red light has longer wavelengths than blue/violet light.

Jacob started getting a little glassy-eyed here…uh oh, it doesn’t get any simpler from here!

We attempted to quickly sum up how the low sun angle at sunset allows sunlight to travel through more of the atmosphere, the color red is able to “scatter” just as readily as the color blue “scatters” when the sun is higher in the sky.  When the sun is higher, most of the atmosphere’s scatterers are receptive to the color blue.  This is a phenomenon called Rayleigh Scattering.  I fear we might have lost Jacob by this point, but it was interesting seeing how much he did pick up from the conversation.

I remember that it generated more questions about the electromagnetic spectrum and I was so impressed with having a conversation with a 6-year-old about how many things in the world around us are traveling in “invisible” waves.  The music on the radio.  The remote control (or the 8-billion remote controls in our house!).  The microwave oven.  The wireless internet in our house.  The satellite television.

Check out these links for other easy-to-understand explanations of sky color.

http://spaceplace.nasa.gov/en/kids/misrsky/misr_sky.shtml
http://science.howstuffworks.com/nature/climate-weather/atmospheric/sky.htm

We, as parents, are challenged with teaching our kids the “right things”.  At least, what we think are the “right things”.  Sometimes those “right things” are contested topics such as evolution, global warming, the causes of the Civil War, etc.  I hope to have an open enough relationship with my kids to discuss the varying viewpoints about those more controversial topics and give them the tools to form their own opinions, even if they might differ from mine.

But when it comes to math and science, I personally feel challenged to push the envelope to teach as much as I can when my kids express interest.  I hope to never blow off one of their “Why?” questions, although I have to admit that can get tough at times!

Originally published on Wired.com’s GeekMom Blog on January 22, 2011.

Fooling the enemy

For those military families, you know the routine…

You have a limited amount of time to pick out your new house, and there are things you just can’t know about the house until you’ve been in the house for a while…

…and then it’s too late. You’ve tranferred the deed…or you’ve signed the lease.

In Florida in 2002 it was evidence of prior flooding that wasn’t disclosed to us.

In North Carolina it was the woods that were sold to a developer that turned our quiet little cul-de-sac into a construction site.

In Nebraska it was the pig farm and feed lot to the south. And with a south wind, P.U.!!! Oh yeah, and the stupid mulberry tree 🙂

This house we’re in now is perfect in so many ways, spacious, well-laid out, good schools, nice neighbors, HUGE backyard, etc.

And then there’s the bombing range.

We are as little as 4 miles from this area of cratering on the Eglin AFB range. And during our first week in the house, we started to hear it after sunset. The plane practicing their bombing. I’m not completely sure what kinds of planes are out there, unless I hear the Howitzer cannon, which is unmistakable!

Most nights it’s in the distance. Like a dull roar of distant thunder.

Tonight it’s much louder — the house is even vibrating!

Honestly, this isn’t enough of an issue that we wouldn’t have lived here. But it’s pretty daunting to hear, let me tell you!

So here’s a map.  We live near the “H” in “Holley Nolf” towards the bottom of the map — I won’t go into detail — and I think the bombing is going on in that faint square in the upper right under the “Ter”/”Earth” buttons.  Zoom in there (go ahead, double click on that spot and it’ll zoom in on the spot!) and you’ll see that it’s an area of craters.  Fun fun!

I’m just glad those planes practicing their bomb runs are on MY SIDE! Thank you for practicing defending our freedom!


View Larger Map

07. October 2010 · Comments Off on Nebraska Discoveries 20: Runza · Categories: Uncategorized · Tags: , ,

Tonight for dinner, we went out.  It tends to be a necessity 1-2 times per week in the fall while the boys are in soccer 5-days per week (Jacob 3 days, Timmy 2).  I do what I can to cook but it’s rather aggressive; when I do cook I try to get the dinner on the table at 5:30pm, the boys have to be finished with dinner by about 5:50pm.

I asked the boys “Where would you like to go?”  We have several choices between our house and Jacob’s practice field.  I had suggested a family favorite, Jimmy John’s, but Jacob had a roast beef sandwich for lunch and said he didn’t want another one for dinner.  Since roast beef is the only kind of deli meat he eats.  Sigh…

We ended up at a local restaurant called “Runza”.  It’s a chain throughout Nebraska (the first one opening in Lincoln, NE in 1949), with a couple of additional stores in Iowa, Kansas and Colorado.  It’s quite good, a fun fast food alternative to your typical hamburger joint.  Definitely not the healthiest option, so we’ll go there 3-4 times per year.  Jacob LOVES Runza sandwiches!  The kids’ meal isn’t enough now, we get him an adult-sized combo meal!

Fortunately, they also sell hamburgers so Timmy doesn’t mind going either.

So…what’s so great about this Runza place?  Well, Runza restaurants feature these unique sandwiches: a seasoned blend of ground beef, onion and cabbage sealed in a special bread.  Cheese optional.

Today I made a cool “Nebraska Discovery“.  Runza is not only the name of this restaurant chain, but it’s also the name of the sandwich featured there.  It came to the Americas via “Volga German” immigrants.  If you do a Wikipedia search for “Runza”, you’re presented a choice: Do you want to learn about the sandwich itself, or the restaurant chain with the same name?

I’m not going to regurgitate what you guys could click on and read for yourselves regarding the history, but I thought it was pretty darned cool.

PS: Our local Runza puts a package of Silly Bandz-like bracelets in the Kids’ Meals! Whoo hoo!

I have to introduce this to the masses. I just have to!

When Dave and I were visiting Niagara-on-the-Lake, Ontario, we enjoyed visiting the little grocery store up the street from our hotel. With the continental breakfast being $13.50 CD per person, per day, just picking up a loaf of bread, a block of butter (Canadian butter, yum!), and a small bunch of bananas at about $8 total took care of breakfast all 3 days we were there.

From 2010 07 06 Anchor Bar & Niagara on the Lake

We also picked up souvenirs at this same little grocery store. Little stuffed moose for the boys, maple cream candies and cookies…mmmm….

And that’s also where I came across a blast from my past: Bovril.

My Mom used to keep this stuff on hand. I guess she incorporated in a lot of our cooking, but I couldn’t tell you exactly what. I think I might have had it in broth beverage form as a kid, but I don’t remember. What I do remember is the distinctive beef flavor Bovril has, and when I saw it in this Canadian grocery store for the first time in several years, I decided to pick up a bottle.

When we visited my parents the following week, I showed them my purchases and they were intrigued that I got Bovril with beef in it.

Huh? Why would it NOT have beef?

My parents showed me the bottle of “British” Bovril they bought at a gourmet grocery store recently, and lo and behold, there was no beef in it. Mine was made in Canada, and there it is in the ingredient list, “BEEF EXTRACT”:

From 2010 09 09 Bovril

Want some Bovril of your own — with the beef? You can get it here.

Okay, enough exposition. Time for the meat and potatoes of this blog post. Except we aren’t discussing meat or potatoes — we’re discussing GRAVY!

Jacob LOVES gravy. His favorite dinners are the ones that include some sort of gravy. And it could be just about any gravy. Chicken etouffee — served over rice with gravy! Beef curry — served over rice with gravy!

Not long after we got back from our Canada/Penn State trip, we were having steak and potatoes for dinner, and I wanted to put together an easy beef gravy. I figured I’d hop online and find a “Bovril Gravy” recipe, but I didn’t. Nothing. All the recipes were for how to make the broth drink.

(Why does that even need to be a “recipe?” It’s Bovril in hot water.)

So I made one up — butter and flour in a roux, then I poured in the Bovril broth in the concentration recommended on the bottle (2 teaspoons per cup of boiling water). I messed up the proportions (too much butter and flour), so I had to add extra water and I ended up with a yummy buttery gravy, with just a hint of Bovril flavor. It was popular with the family, so I’ve attempted it a couple more times with higher concentrations of Bovril.

Tonight, I made this again with meatloaf and I think I perfected it! And I even measured the ingredients. We all wanted to lick the gravy off our plates!!!

Homemade Bovril Gravy
Makes 6 servings (1 1/2 cups)

3 Tbsp. butter
1/4 c. flour
1 Tbsp. Bovril Liquid Bouillion (from the 250ml bottle…not the concentrated paste in a jar)
1 1/2 c. boiling water

In a small saucepan over medium heat, melt the butter, then whisk in the flour.  Ta da!  Now you have a roux!  Heat the roux over low-medium heat, stirring constantly, until it just starts to brown. 5-7 minutes.

(The darker this roux gets, the less thick your gravy will be…different people have different tastes…experiment and come up with what you like).

Add the Bovril to the boiling water, then slowly whisk it into the roux. Allow to come to a gentle boil (you shouldn’t have to raise the heat at all, the heat of the roux will bring it to a boil quickly). Boil for 1 minute or until thickened.

The beefy-buttery flavor is so rich and delicious! A little goes a long way, but you won’t want just a little.  I’ll now close with a gallery of fun retro Bovril posters:

We’ve done this two times before here and here, but it’s worth discussing again.

It’s late August at Offutt AFB — time for an AIRSHOW!

This year’s airshow lucked out with a last-minute booking of the Thunderbirds after the Coney Island Airshow was cancelled. (Don’t know why, message boards have speculated it was financial). Unfortunate for an entire airshow to be cancelled, but yay for us, right? When the airshow was first announced in mid-July, the F-22 Raptor Demonstration Team was the headliner.

Like the past two years, the aircraft start to roll in around mid-week and we can see the air traffic from throughout my neighborhood as the aerial demo teams start to practice their shows. While the propeller planes and helicopters stay pretty close to the runway, the jets need more maneuvering space and often have to turn around over our neighborhood. Whoo hoo! So we were seeing the Thunderbirds, the F-22 and F-18 several times right from our yard! The kids at school had quite a treat during their recess on Thursday and Friday too 🙂

In 2008 we watched the Thunderbirds from the local bike trail. In 2009 we watched from a local neighborhood that offered a good view. This time, the boys and I watched right there in the middle of the action.

Enjoy some of our experiences from the airshow.

These KC-135s are Nebraska Air National Guard planes from Lincoln
From 2010 08 28 Offutt AFB Airshow
I’d never seen a Global Hawk UAS up close before, after all the times I’d forecast for them….
From 2010 08 28 Offutt AFB Airshow
More »