04. January 2010 · Comments Off on Harvesting the Poop! · Categories: Uncategorized · Tags: , , ,

Around Halloween, it got cold enough in our basement that I had to bring my worm bin upstairs to the living room. I keep my house pretty cool, but for the past 2 months my worms seem happy enough. We have been giving them about a pound of food scraps per week.

Other than giving them food, I sort of neglected giving them additional “bedding materials” since Thanksgiving, and today when I opened the bin to toss in some banana peels, I was greeted with an, um, odor. It wasn’t a horrible odor, but it was certainly different than what I had been smelling, which was just the smell of dirt.

I decided an emergency “worm castings harvest” was in order. I hadn’t done this yet, so I had to refer to a technique I had read several months ago. I attempted another popular technique of pushing the older, more processed castings to one side of the container, filling the empty side with clean bedding and fresh food. This didn’t seem to make a difference for the worms, many of them went to the clean side, but websites seemed to indicate a mass exodus from the “old side” and this simply wasn’t the case for me.

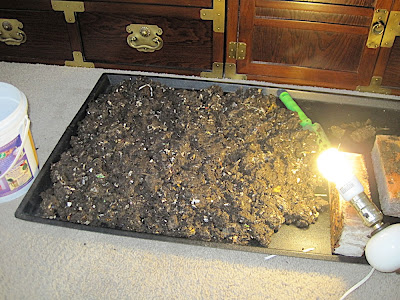
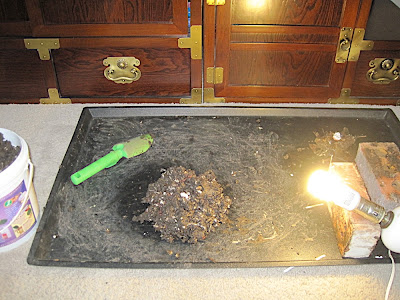
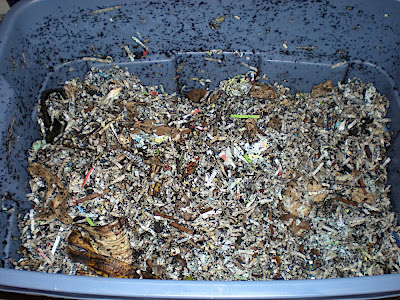
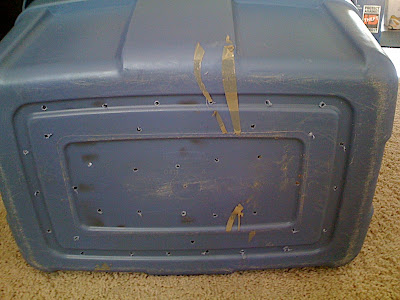
So here we go — I dumped out the contents of the bin and immediately tossed the newer bedding and food scraps back into the bin. The black tray there is the bottom of Howie’s crate from when he was a puppy. He no longer uses a crate.

From 2010 01 03 Worm Casting Harvest

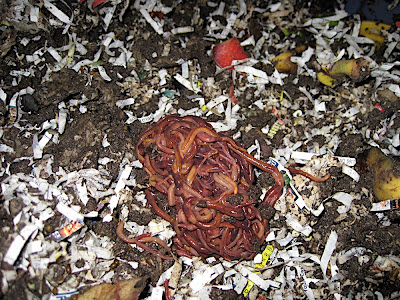
Note the light on the right. This light is used to “scare” the worms into the center of the pile.

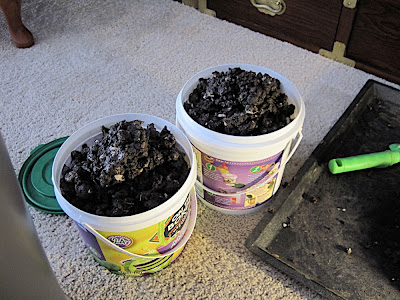
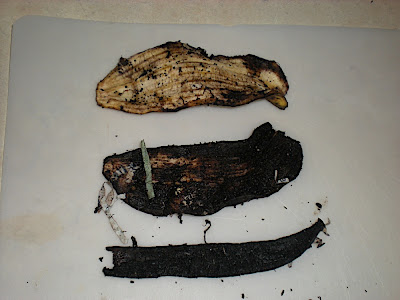
This project took me two hours — to slowly pick at the castings. The clumps of castings went into the buckets, while worms, food scraps and obvious areas of shredded paper went back into the bin.

From 2010 01 03 Worm Casting Harvest

From 2010 01 03 Worm Casting Harvest

From 2010 01 03 Worm Casting Harvest

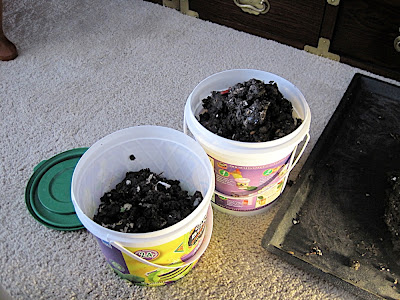
By the way, yes, those are margarita mixer buckets you see there. Great for gardening jobs!

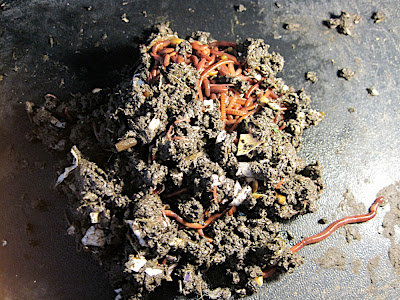
So…as you can see, the pile works down pretty nicely, with a bit of patience.

From 2010 01 03 Worm Casting Harvest

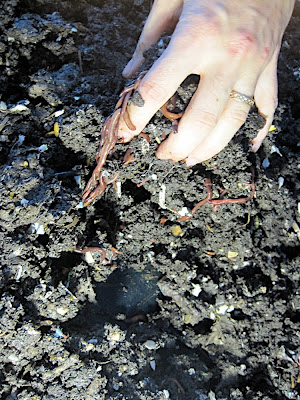
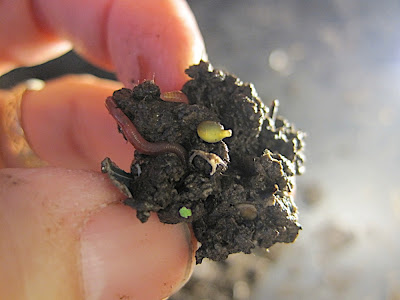
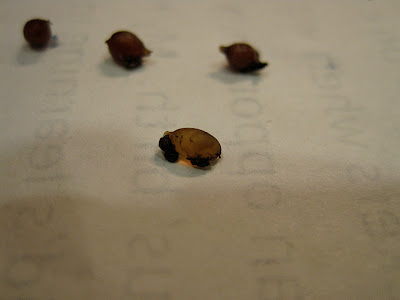
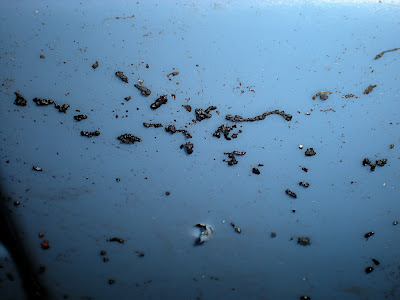
I guess now’s a good time to mention that my castings were chock full of cocoons that I was attempting to save as well.

From 2010 01 03 Worm Casting Harvest

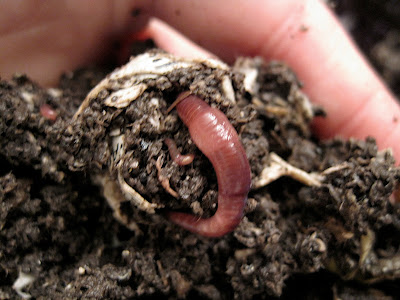
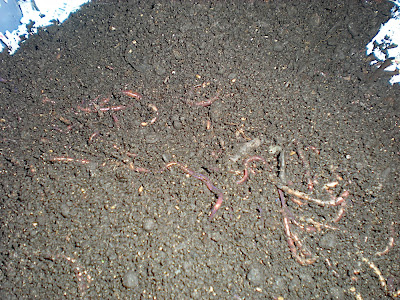
A view of a hunk of casting with worms and cocoons.

From 2010 01 03 Worm Casting Harvest

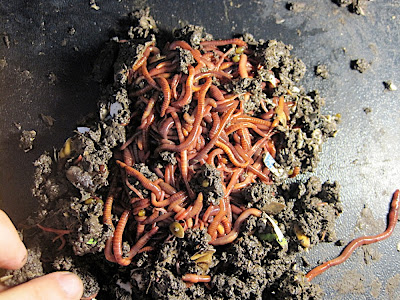
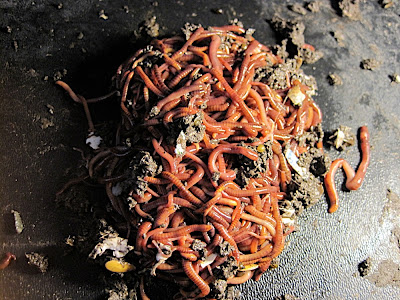
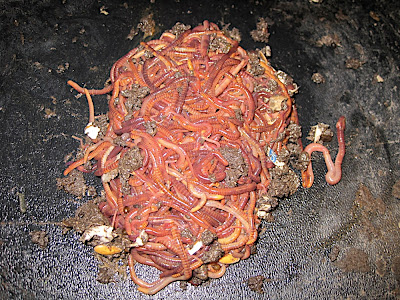
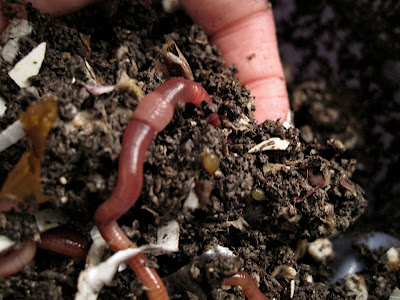
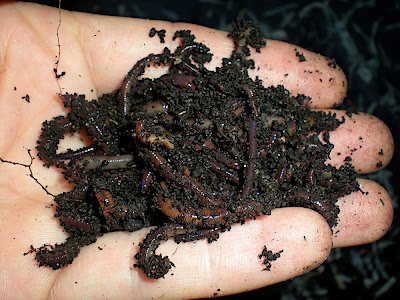
Now for the cool part — as I pick away at the castings, the worms are continuing further and further into the center of the pile to avoid the light. But at a certain point, the pile becomes nothing but worms!

From 2010 01 03 Worm Casting Harvest

From 2010 01 03 Worm Casting Harvest

From 2010 01 03 Worm Casting Harvest

From 2010 01 03 Worm Casting Harvest

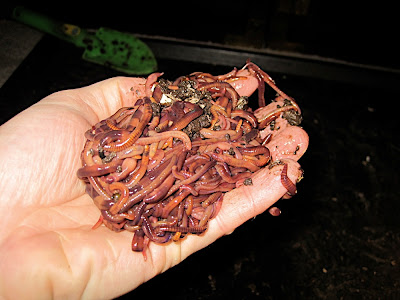
Then, it’s easy to pick up the clump of worms and toss them back into the bin:

From 2010 01 03 Worm Casting Harvest

From 2010 01 03 Worm Casting Harvest

Jacob won’t touch the worms, but Timmy enjoys checking them out!

From 2010 01 03 Worm Casting Harvest

I filled both of these buckets with castings, I’d guess about 10-12 lbs. total! There are still a number of baby worms in the buckets, ones that I couldn’t easily pick out of the castings…I don’t know if they’ll survive in the basement, either from the cold or from the lack of food scraps. For now the buckets are simply in a giant Ziploc bag in the basement. It had been on my mind to toss the castings into my garden plot immediately (after all, wasn’t that the point of all this effort?), but it’s currently under about a foot of snow.

From 2010 01 03 Worm Casting Harvest

There you have it! I’ve successfully harvest castings from my worms! I’m so excited about that.

However, I’m not sure I like the two-hour-long pick-fest with the castings. I’m eyeing this apparatus for future use.

03. December 2009 · Comments Off on Worm Update…Let’s Get It ON! · Categories: Uncategorized · Tags: , ,

Just call me Heidi Fleiss.

After all, I was pimping out my pumpkin flowers earlier this summer.

Winter has finally arrived here this week. It’s 26 degrees F outside right now, with a low of 22 expected overnight, and lows in the teens later this weekend. And windy too. So our house is beginning to cool down and my worm bin, which has been in the basement since they first arrived at the end of August, now has to move upstairs as our (unfinished) basement plunges into the 50s.

After some growing pains with how often to feed the worms (tip: always err on the side of underfeeding), and moisture control resulting in white mites, and escapism, I discovered about a pound of food every 10 days does the trick.

So after 3 months, I now have half of the bin filled with rich, black castings, and I’m starting up the opposite side with new materials.

Tonight, when I checked on the worms after moving them upstairs — where the light is much better — I discovered that my worm bin was filled with BABIES! I dug down some and found dozens of worm “cocoons” in the mature half of the bin. Whoo hoo!

So I’m now hosting a vermicomposting RED LIGHT DISTRICT in my kitchen!

According to a Vermicomposting How-To Site, I found this description of red worm reproduction:

Hermaphroditic:

Redworms have both sexes, but mating is still necessary. If the worm has a swollen band, called the clitellum, at about one third between head and tail, this means that the worm is sexually mature. Redworms mate in their bedding at different levels, sometimes even on the surface. They may mate at any time of the year. They are attracted to each other (maybe for their beautiful body face, or other irresistible qualities.) They find each other and lie with their heads in opposite direction, bodies closely joined. They produce a secretion and secrete this through their clitella, a mucus that forms a band around each of them. Sperm from each worm move down a groove into receiving pouches of the other worm. The sperm enters in a storage sac. Some time after the worms have separated, the clitellum secretes another substance called albumin. This material forms a cocoon in which the eggs are fertilized and baby worms hatch.

Redworm cocoons are round shaped and small. They change color during their development, first white, becoming yellow, later brown. When new worms are ready to emerge, the cocoons are turning red. It takes at least three weeks for the worms to develop in the cocoon. Temperature and other conditions are factors in the development of the hatchlings. Although a cocoon might hold as many as 20 eggs, usually only 3 or 4 worms will emerge. The young hatchlings are whitish with a pink tinge showing their blood vessels.”

Here’s a closeup (thanks to my new camera, which arrived today) of a worm cocoon.

From 2009 12 02 Worm Cocoons

Here’s a closeup of the “swollen band” mentioned above indicating a sexually mature red worm. If you look VERY closely just to the left of the swollen band, you can see a baby worm looping through the castings:

From 2009 12 02 Worm Cocoons

Here’s a handful of worm castings after 3 months in the bin, after they’ve consumed about 10 lbs. of food since late August. You can see a mature red worm on the left, and the yellow pearly spheres are cocoons.

From 2009 12 02 Worm Cocoons

When the sun is shining into my kitchen tomorrow or Friday, I’ll attempt to get pictures of some of the tiny baby worms, they look like little 1/4″ threads.

I’m so excited — I may actually make the investment for a REAL worm bin. We’ll see….

03. September 2009 · Comments Off on Worm Update · Categories: Uncategorized · Tags: ,

Well, it’s been 10 days and this has been very fascinating! This is a great project for kids, my boys are getting a kick out of it.

I’ve been checking up on the worms every day or so, most days just opening the lid to make sure I don’t have any more mass evacuation attempts. But every 3 days or so I would toss in a few food scraps. After tossing in some “sweets” on day 3, things seem much improved. There are usually worms crawling up the sides, but now no more than 4-5 at a time.

Those food scraps did the trick last Thursday. The worms took a couple days, but eventually all migrated towards the banana peels and tomato slices and in 48 hours, had been pretty cleared out. So on Saturday I added about 1/2 lb. of kitchen scraps: apple cores, banana peels, old lettuce and cabbage. And a couple eggs worth of shells, crumbled. I need some more guidance on how often and what techniques to use for feeding, but I’ll get a system together soon enough.

Happy Worms! Enjoy some pictures from this afternoon:

From 2009 09 03 WormBin_Vermicomposting

This is the worm bin after 10 days. It’s simply COVERED in worm castings now…despite adding food daily, there is no odor.

From 2009 09 03 WormBin_Vermicomposting

A closeup of the worm poop trails. Lovely, huh? This is pure compost, as good as it gets for your garden.

From 2009 09 03 WormBin_Vermicomposting

If you find some REALLY rotten food, you can find a HUGE tangle of worms. This grouping was tangled around a banana peel.

From 2009 09 03 WormBin_Vermicomposting

The top peel was added last night, the middle peel is about 3 days old, the bottom peel was from Friday.

27. August 2009 · Comments Off on My Worms Are Trying to Escape! · Categories: Uncategorized · Tags: , ,

I didn’t get any pictures because I had to work quickly. This morning I lifted the lid to the worm bin and dozens of the worms had dripped off the underside of the lid all over the floor!

Not all of them, but plenty. Timmy got a kick out this!

Anyway, I figured I’d try to improve their habitat a little and added some sweets to the top of the bin. Just a little bit: a couple banana peels and a couple slices of tomato that weren’t used for burgers a couple nights ago.

I put back the strays, added the sweets, and replaced the lid. I’ll check again later this afternoon and see if they’re happier.

According to this website, some escape shenanigans are normal and should subside in a week or so unless there’s a bigger problem that I’ll need to further investigate.

26. August 2009 · Comments Off on The Worms Are Here! · Categories: Uncategorized · Tags: ,

I’m actually following through with this cockamamie idea!

From 2009 08 26 Red Wiggler Worms in Bin

Yes, that’s my hand holding those worms, and no, I’m not squeamish about it in the least.

I had ordered my 2 lbs. of red wiggler worms from Gardener’s Supply last week, and they arrived this afternoon! It was just a few minutes before Jacob came home from school, so I waited until both boys were home before I put them in the bin.

It’s somewhat anti-climatic. You dump the worms into the prepared bin, and they burrow down out of the light.

That’s it.

It’ll be many weeks before I have anything else to say about this, but here are some pictures of what things are like in our basement for now. After I took these pictures I mixed in the soil-like material with the shredded paper and cardboard, put on the lid and walked away:

From 2009 08 26 Red Wiggler Worms in Bin

From 2009 08 26 Red Wiggler Worms in Bin

From 2009 08 26 Red Wiggler Worms in Bin
17. August 2009 · 2 comments · Categories: Uncategorized · Tags: , ,

“Vermi…what? Okay Major Mom, now what are you trying to do????”

All summer I’ve been basking in yummy veggies being harvested: lettuce, green beans, tomatoes, cucumbers, carrots and hops! Earlier this season I was using my compost to fertilize things and that really helps — but over the past month the balance in the compost has been thrown off and now my compost is this nasty slimy stinky mess. I’ve already had to clean out the sludge a couple times this past month and things aren’t improving. Too much moisture, not hot enough, not enough “brown matter” such as dry leaves.

This fall I will be able to work in the leaves as they fall from the trees, but until then, my compost is more or less useless. I can buy stuff to help things along, and I’ve done that before, but I think it’s a bit late in the season to make it worth the $20 cost. Heck, it gets so cold here in the winter, the compost will not really get back to work until springtime.

So here I am, compostless. With little hope until springtime.

It rained a lot this past weekend…and while I was working on my garden just after a 1/2″ soaker, I noticed the plethora of earthworms surfacing. And how fabulous the soil is when lots of earthworms are working through it — the soil remains aerated and rich. The boys and I dug up a couple hundred worms and tossed them into the compost bin — hopefully there are enough yummies still in there for the worms to help things out some.

That, of course, led me to hopping on the web and learning more about the worm casting process. Fascinating! With little more than a plastic bin and the old bills and papers I shred anyway, I could continue to generate compost all winter long!

So on Sunday I did it — I ordered a batch of red wiggler worms that should be here by mid-week. In the meantime, I started preparing a bin so that as soon as the worms arrive they can go in.

I found many commercially available household worm bins for sale, usually for $75-150. But really, I think this is something I could do myself.

First I found one of the many storage totes that I tend to break out for PCS time. You’ll see that this one was marked “Christmas” and last year was filled with legacy Christmas lights. Over the past couple years we’d converted to LEDs, so I just tossed the old lights into a paper bag. Anyway, I drilled some 1/4″ holes into the bin, across the bottom and along the top half.

From 2009 08 17 Vermicomposting

Then I filled the bin with shredded paper and some paperboard, such paper egg carton material. Then wet down the paper to a “wrung-out sponge” consistency. The worms now have a new home waiting for them.

From 2009 08 17 Vermicomposting

I’ll be sure to let the world know how this turns out!