19. July 2011 · Comments Off on Not-Quite-Boston Baked Beans · Categories: Uncategorized · Tags:
Boston Baked Beans with a Southern flair….

I’ve been rather scarce, busy with our visitors this past weekend (that’s for another blog post which is forthcoming) and now that the extended family is now all safe and sound back home, I have some time to play catch-up with the household and some of the administrative pieces of my life.  I can also catch up some blog posts on my mind….

While we were visiting my parents in June, they grilled steaks and burgers for us.  They also served up some delicious homemade “Boston Baked Beans”.  My Dad had made them from scratch (he loves to cook!) from a recipe from America’s Test Kitchen’s Cook’s Country magazine.  Since the recipe is copyrighted and you have to pay to see the recipe online (or at least sign up for the 14-day free trial), I’ll point you to the website, but won’t reproduce the recipe here.

Jacob and I are the only bean-eaters in the family, which is unfortunate, because beans are so stinkin’ (pun intended) good for you!  Low fat, high fiber, flavorful…

Dad gave me a printout of the recipe from the magazine (which he could do as a paid subscriber) and I made up a big pot of them the day after I got home from our trip!  Except, I didn’t make them exactly as in the recipe, since I had some ingredients on hand that I thought would make reasonable substitutes….

…starting with the salt pork.  I had a HUGE package of ham hocks in the freezer.  After all, this is the south and ham hocks are WAY easier to acquire than salt pork…Emeril Lagasse has a ham hocks and beans recipe that will seem similar to mine, except I’m keeping the molasses and brown sugar from the Boston baked beans…

…and the Dijon mustard.  If you open our fridge, you’d be greeted with four bottles of mustard: two bottles of French’s yellow mustard, one bottle of Gulden’s brown mustard, and one bottle of Zatarain’s Creole mustard — hands down the best mustard EVER!  I had a hankerin’ for the Creole mustard…

Dad told me that Boston baked beans, by definition, has molasses and salt pork or pork fat, so my substitution of something other than salt pork would make them migrate away from their Bostonian roots.  And then I can share the recipe!

The other point to make here is that this is a “quick cook” beans recipe.  Boil the beans with some baking soda for 20 minutes to soften them.  After some prep cooking of the meat and veggies, you simply bake the beans for about 2 hours — having just-like-cooked-overnight beans in a fraction of the time!

Patricia’s Not-Quite-Boston Baked Beans – inspired by “Quicker Boston Baked Beans” recipe in June/July 2011 Cook’s Country magazine.

1 lb. dried navy beans, picked over and rinsed
1 Tbsp. baking soda
2 large ham hocks, slice as much meat off the bones as possible; keep the bones
1 onion, chopped fine
3 c. water (4 – 4 1/2 c. if you use a Dutch oven)
5 Tbsp. packed dark brown sugar
1/4 c. plus 1 Tbsp. molasses
2 Tbsp. Worcestershire sauce
4 tsp. Creole mustard
2 tsp. cider vinegar
Salt and pepper

1. Heat oven to 350F.  Make sure oven rack can accommodate your Dutch oven.  Bring 3 quarts water, beans and baking soda to a boil in Dutch oven over high heat.  Reduce heat to medium-high and simmer for 20 minutes.  Drain beans, rinse excess cooking water.

The skins will peel back from the beans, this is a good thing!

2. Return empty pot to medium-high heat.  Cook the chopped ham hock pieces w/ the bones until well-browned, about 10 minutes.  Add onion and cook until soft, about 5 minutes.  Stir in water, beans, sugar, 1/4 c. of molasses, Worcestershire sauce, 1 Tbsp. of the mustard, vinegar and 1/4 tsp of pepper and bring to a boil.  Cover, transfer to oven and cook until the beans are nearly tender, about 1 1/2 hours.

Chopping meat off a ham hock isn’t that easy, but will help things cook down better while in the oven.
Brown the pieces.
Don’t be afraid to let the pieces stick to the bottom some…that’s the good stuff!
Combining everything.
Don’t be afraid to throw in the bones.  The meat and fat there will flavor things up nicely.

3. Remove lid and continue to bake until beans are completely tender, about 30 more minutes.  Stir in the remaining 1 Tbsp. of molasses and remaining 1 tsp. mustard.  Season with salt and pepper to taste.

The same ham hock bone after cooking.  Pick out the bones before serving!

A great main dish!

YUMMMMM!
02. July 2011 · 1 comment · Categories: Uncategorized · Tags: , , , ,

Yes, these posts are hideously out of order, but I’m writing them in the order of ease of collecting my thoughts.  Sorry about that 🙂  Maybe I’ll force the dates around some when I’m all done.

We started out in Greenville, SC on the last day of our road trip.  It was about 2 1/2 hours to Atlanta and I had the kids think nice and early about what they’d like for lunch.

Tangent: I learned this nice and early in our roadtrip — I let the kids choose at one point and the request was for Taco Bell.  I plugged “Taco Bell” into our GPS and we had passed one about 20 miles back…and there were NO MORE Taco Bells on our route for the next couple hours.  So I learned to have the kids decide at least an hour in advance.

Anyway, since we were going through Atlanta, I figured we’d have no problem finding what the kids were looking for…

…and then they requested Chick-Fil-A!  Seriously!

For my non-US readers, the Chick-Fil-A chicken sandwich was invented in Atlanta.

(Okay, actually it was invented in Hapeville, GA, but that’s right outside of Atlanta).

A light bulb went off in my head!  Why not take the boys to the “original” Chick Fil A restaurant.  And that’s what we did.  Luckily, The Dwarf House is less than a mile off our interstate highway route.

The Dwarf Grill was opened by S. Truett Cathy and his brother in 1946.  It was essentially a basic short-order grill diner, serving basics such as burgers and sandwiches.  In 1967 Chick-Fil-A restaurants began to appear in mall food courts, featuring the chicken sandwich that was made very popular at the Dwarf House.  The restaurant chain has grown to more than 1,500 retail outlets, in malls, airports, hospitals and stand-alone restaurants.  It’s one of my kids’ favorite places to eat.

We got to The Dwarf House right at 11am and we chose to eat in the diner area right in front of the Seven Dwarves animated mural.  By the time we left 45 minutes later, there was quite a line to be seated.  This restaurant is across from the Delta corporate offices and I’m guessing a lot of the patrons were from there.

Note the short front door.  There’s a regular sized door on the side, but most customers use that little red door, which is about as tall as Timmy.
It’s a full service diner, made for a nice lunch experience.

Along with the other diner fare, you can get the full Chick-Fil-A menu as a “platter” with two sides.

This is my yucky iPhone picture of the animated Seven Dwarves.  The dwarves are moving along a bicycle-chain-type conveyor from home to the mines.

Jacob loves the Spicy Chicken Sandwich.  Everything (except the milkshake that you see on the far right) was served on china with real silverware.

Timmy got nuggets with waffle fries.

The waitress we had was so sweet, I meant to take a picture of her with the boys, but I didn’t, sorry.  She brought little stuffed cows for the boys after lunch.  I asked for a bunch more for Dave’s squadron (they use the Holstein cow as their mascot).

01. July 2011 · 3 comments · Categories: Uncategorized · Tags: , ,

Last weekend the boys and I bid farewell to Dave in Harrisburg headed up to the Stratton, Vermont area for some camping with my dear friend (and former college roommate) Megan and her son Aidan. Some mother/son bonding time was had by all 🙂

We had a great time catching up — we last saw Megan in 2008 and Aidan had grown up so much!  Literally, he must be a head taller than Jacob, and they’re only about 3 months apart in age.

It was chilly and rainy most of the weekend. Every day the forecast called for clearing the next day, but then it remained drizzly and cloudy. Ugh! It cleared up our last evening there, and by then the firewood was too wet to burn.  Were it not for the lousy weather, I’d have called it a perfect weekend! The kids got along very well together.

Our trip to the Wanderlust Yoga & Music festival will be saved for another post, but for now here are some pictures of our camping trip, and then enjoy my semi-made-up dump cake recipe for the Dutch oven.

Our set up for 3 days.  No complaints about our tent or the temperatures.  At least it wasn’t a cold rain.  The canopy was a godsend for  keeping the table dry for meals.

This is a white admiral butterfly fluttering near the fire ring.  Common in New England.

Jacob and Aidan were teaching Timmy how to play catcher.  We purposefully chose a tent site near a field so the boys could play baseball.  They played for hours all weekend…this was a game they were playing as soon as they woke up, they’re in their pajamas still.

Our one and only hike at Townshend State Park, which was cut short due to the trail crossing a creek that was running so high and fast I didn’t trust Timmy making it across.

Dave had the good camera, all of these camping shots were taken with my iPhone.

Since the hike was cut short, the boys could spend extra time skipping stones across the creek.

Since it was too wet to make a fire for the hot dogs, we used our camp stove.  Corn steaming on the left, dogs/brats and rice pilaf (cooking on the backpacking stove on the right) for dinner.

Now that you’re drooling from our camp dinner, let’s talk about what we did for dessert.

I had brought along my Dutch oven. I have a 10″ Lodge footed Dutch oven with a brimmed lid.  I’ve owned it since 1997 or so, it’s been great for Civil War reenacting meals and with enough care, I’ve been able to use it to cook on modern family campouts too.

Because of the lousy weather, Megan and I weren’t sure whether we’d use the Dutch oven at all, but on Sunday at the grocery store, I quickly grabbed some cake mix and pie filling and decided to throw together an easy dump cake.

I recalled this popular dump cake recipe, which I’d seen variations of many times, so I brought it up on my iPhone while in the grocery store and did my best to remember the ingredients after I lost the signal.

Except I forgot about the pineapple.  That’s okay, because we had strawberries and blueberries.

Coleman now makes these nifty Dutch oven liners that are essentially large circles of parchment.  No more crazy cleaning!  I put 1 can of cherry pie filling, 1/2 pint of fresh (local) strawberries cut up, and 1/2 pint of fresh blueberries into the pot.  I considered stopping here and just serving fruit for dessert, this looked so pretty 🙂

Take one box of yellow cake mix…

And cut one stick of butter into 8-12 pieces.

“Dump” the cake mix on top of the fruit.

Then dot the mix with the pieces of butter.  Like my berry-stained hands???

Do your best to even things out, but I was seriously winging it here so pardon that this isn’t very pretty.

Now what?  Before I “dumped” the ingredients into the pot, we had fired up a pile of charcoal briquettes.  This website provides some great tips on how to convert the amount of heat you need into the number of greyed-over briquettes.

Since I’ve baked cobblers and biscuits in this Dutch oven many times, I remembered that I needed 24 briquettes, with 14 on the top and 10 on the bottom, to replicate 350F for 30-45 minutes.  Set that in your campsite fire pit and go enjoy your dinner!

The parts of the Dutch oven right over/under charcoal briquettes will become local hotspots, so it’s important to rotate the oven every 15 minutes or so for even baking.  Turn the lid 90 degrees AND rotate the oven over the top coals by 90 degrees in the OPPOSITE direction.

Here is the finished product after 45 minutes…there were some areas of dry cake mix remaining, and that’s my lack of even butter distribution, sorry 🙂

A nice big closeup pic for your enjoyment.  The butter melts and combines with the cake mix and fruit juices to make this super-sweet gooey dessert!

Now I wish I had at least picked up a tub of Cool Whip or a can of Redi-Whip….this was SO SWEET!  But delicious!

Sadly, this was our leftover cake.  It’s very very rich…a little goes a long way.  Megan was able to pick up the whole piece of parchment and plop it into a storage container to take home the following morning.
13. June 2011 · 2 comments · Categories: Uncategorized · Tags: , ,

I guess good recipes travel fast!  I was delightfully surprised when one of Brandie @ The Country Cook’s friends, Laurie @ Feeding My Ohana, contacted me about how excited she was to see a non-commercial simple Huli Huli Chicken marinade recipe at The Country Cook a couple weeks ago.  Laurie tried it and gave it a thumbs up!

Last Wednesday she featured the recipe, with a summary of my two blog posts from Memorial Day weekend 2009, on her blog.  She graciously omitted the chicken mutilation pictures, lol!  She added a key part to the recipe that I’d been forgetting about all these years: Shouting “HULI!” when you turn the chicken on the grill.

You can’t forget to do that!

01. June 2011 · 3 comments · Categories: Uncategorized · Tags: ,

My dear friend Brandie at The Country Cook has a surprise waiting for us this morning!  My first ever guest-blog-post!  The Country Cook is fun because each of Brandie’s recipes has a great story to go along.  I had the PERFECT recipe to add to her blog and was so excited to get to share it!

22. May 2011 · 1 comment · Categories: Uncategorized · Tags: ,

Corn’s been in my mind a lot this week.

“Yeah, being in Nebraska will do that to you….”

As I was saying, some corn-related items have surfaced these past few days, not just from being here, but I guess in general.

Corn thought #1: In Florida, local corn harvests are in full swing, with our local Publix grocery store offering yellow, white and bi-color corn from a farm in Belle Glade, FL.

Okay, so that isn’t super local.  I realized that I could drive to Houston in less time than it would take me to drive to Belle Glade, which is west of West Palm Beach along Lake Okeechobee.

It’s been great having fresh corn available to us for as little as 10 cents per ear!

Corn thought #2: This week The Pioneer Woman held another Kitchen Aid Mixer giveaway, and she randomly selects the winners from the folks who answer simple questions in her comments section.  Here’s the giveaway post, and you can see how many comments it generated.  Yep, you read right…over 51,000 comments!  The question was “What’s your absolute favorite vegetable?”

The following day, she not only posted the randomly-selected winner, but she also offered the statistical distribution of what answers she received.  Number one on the list?  Corn!

Potatoes were #5 on the list, and I don’t agree with that one either.

Last summer, when Nebraska corn was available at roadside stands, I had set up a quickie poll to ask about whether corn should be treated as a starch or a vegetable at the dinner table.  My family’s inclination is to use it as a starch, although I know that school cafeterias and 2/3 of my poll respondents treat corn as a vegetable.  I wrote up the results, along with a ranting about Florida corn being available at my local Eastern Nebraska Wal Mart (and how stupid that seemed).

I think I’m going to present that poll again…I have a pretty wide range of readers now.  Look to the right of the ORIGINAL blog post (it won’t work if you’re viewing this on Facebook or via RSS/e-mail) and answer my non-scientific poll question!

Corn thought #3: Enjoy a picture the gift I bought for my boys today at Chocolaterie Stam in Papillion, NE.  They’re filled with a hazelnut chocolate creme…yum!  These chocolates give props to the first American Chocolaterie Stam store in Des Moines, IA.  Jacob asked me to bring some of these back from Nebraska for him.

Aren’t they cute?  Each one is about the size of my pinky finger.
21. May 2011 · 2 comments · Categories: Uncategorized · Tags: , ,

The mimosa trees are starting to bloom….

…or so I thought…

I have loved these pretty trees since I was a kid in southeastern Virginia…this one is blooming right up the street.

I’ll take my iPhone along on runs so I can listen to tunes, but about once a week I get distracted so much by the pretty flowers, I stop to take some pictures with the iPhone camera. It does a pretty decent job.

So I took several pictures of this “mimosa” tree and was all set to write up not just about the tree, but also about the delicious Sunday brunch staple: The Mimosa.  I’ll get to that particular Mimosa in a minute.

In case you hadn’t noticed after all these years, my posts about pretty flowers, cool trees or curious critters on this blog never lack at least a cursory round of research and web links for you to learn more.  This will be no exception.

Right away, I learned that these trees I’ve called “mimosas” for decades aren’t really  “mimosas”.  They’re Persian silk trees.  The geneses Mimosa and Albizia are both in the family Fabaceae.  Many folks are familiar with the mimosa species whose flowers quickly contract when touched.  You might know it as the “Sensitive Plant”, botanically known as the Mimosa pudica, seen in this video (you will get the gist of it in the first 10 seconds).

It seems so theraputic, doesn’t it?

Okay, okay, since the point here is that this ISN’T a mimosa, let’s focus on what this IS.

According to my buddy Wikipedia, the Persian silk tree is native to much of Asia, from Azerbaijan to China to Korea.  It was brought to the U.S. in the 18th Century as an ornamental tree and has become an invasive species in the eastern U.S., particularly in the northeast and Mid-Atlantic states.  It is commonly confused with both mimosas and acadia trees, because of the similar patterns of their respective leaves.

In true Internet-geek fashion, a short series of click-throughs led me to the Florida Exotic Pest Plant Council, whose mission is to manage the spread of invasive species in Florida’s natural areas.  Every two years the Council publishes a list of Florida’s invasive plants, placing each species in a Category I or Category II.  Category I is more dire, meaning the species is capable of altering a natural ecosystem if left unchecked.

The Persian silk tree is a Category I invasive species.

Nonetheless, I grew up thinking these trees are so pretty, and I won’t change my mind on that.  What I WILL change my mind about is trying to get one for my own landscaping one day.

Let’s shift gears and talk about another Florida Discovery my Dear Husband and I have made: The Mimosa.

(That’s Mimosa with a capital “M”).

Within a week or two of our arrival, our family had a hankerin’ for some seafood, and ventured out to Pensacola Beach, where we were met with several choices.  We chose a touristy joint called Crabs — We Got ‘Em.  It was Sunday early afternoon and we were given a brunch menu that included several brunch-ey entrees, and all-you-can-drink Mimosas!  We ordered right up and the Mimosas were so delicious!

Now Dave and I want to keep a bottle of inexpensive Champagne on hand just so we can enjoy them on weekend afternoons.

So what is in a Mimosa?  Very simply put, mix equal parts Champagne and chilled orange juice in a Champagne flute.  Stir and serve with a light brunch.

Enjoy some history behind this drink.  Or this history, which also mentions the “Buck’s Fizz”, which is a very similar beverage.

In our house, we enjoy “Indian River”-brand orange juice, which is found at our local Publix supermarket, at a cost comparable to other national brands, but is MUCH more delicious!

Like the glass?  One of our Vegas souvenirs from 2006.  We stayed at the Flamingo.

I don’t have any champagne flutes.

Enjoy one this weekend!
09. May 2011 · Comments Off on Kids’ Request: Pioneer Woman’s Homemade Restaurant-Style Salsa · Categories: Uncategorized · Tags: ,

Last night the boys asked to make homemade salsa.  We were coming home from a fun run last evening and I told the boys we could stop at Publix to pick up the things we need.  I whipped out my iPhone (“Pardon me while I whip this out….”) and Googled a salsa recipe.

I don’t know how she does it, but Pioneer Woman’s salsa recipes topped by Google search results.  I chose the “Restaurant Style Salsa“.

We have fresh jalapenos and cilantro in my garden (YUM!), and a big fat Vidalia onion and some garlic in my veggie drawer, so I picked up the other items I needed.

I didn’t take step-by-step instruction photos since PW takes care of that for us, but here’s our end product!  The boys were devouring it as soon as I opened the food processor lid.

That’s Timmy’s hand dipping in a chip to taste.

This recipe makes a TON of the salsa (that’s a 12-cup food processor there that’s 3/4 full) — I’m inclined to put some in jars and run it through the canner.

I’d put this salsa up against anything we’ve had in Mexican restaurants!  It’s pretty tasty, the kids enjoyed it (hooray for veggies!), and by some miracle after eating about 1/2 cup of the stuff with last night’s dinner, I didn’t get heartburn!  Whoo hoo!

27. April 2011 · 5 comments · Categories: Uncategorized · Tags: ,

Tonight I’m making chicken tikka masala for dinner.  I never thought in a million years I’d be cooking homemade Indian food, but here I am!

I don’t keep a ton of fancy spices on hand, they tend to expire before I use it all up.  But for the past few months I’d been seeing these McCormick’s Recipe Inspirations at our local grocery stores and I got to thinking….

“Yes, I can smell the smoke!”

GROAN.  Anyway, in my often-difficult attempt to cook as much as I can from scratch, I pondered this product and decided this can’t be too bad.  I picked up a card this week at our local commissary.  Chicken Tikka Masala.  At only $1.08 (that’s the commissary price, it’s probably at least double that at your local grocery stores) it already presented more appeal than a jarred simmer sauce or one of those frozen all-in-one meal kits.**

So here’s what we have…it’s a card filled with little bubbles of spices.  Just enough for the recipe you’re making, pre-measured for your convenience.

Flip the card over, and you have a listing of ingredients on the card, and the recipe.  So while you’re on the same shopping trip you can pick up the rest of the ingredients you need.

Truth be told, I had everything in this card except for the “garam masala”…if we like this, I can pick up some garam masala at our local Asian grocery store, hold onto the card and make this in the future…

Here’s my assembly of ingredients ready to go.  (Except for the salt and cornstarch, which I always have on hand).

Don’t freak from the heavy cream — you don’t need a lot of it…

So when you peel the back of the card, I’m greeted with 6 individually wrapped packets of spice, marked with the type of spice and amount.  I ordinarily would whine about the amount of packaging here, but there’s some utility to have the packaging this way just in case you choose not to use all the spices and you want to store it for later.

I prepared the dish exactly as the recipe recommended.  I didn’t include the red pepper (which was optional anyway), but instead gave that particular packet to Jacob.  He loves red pepper flake!

The verdict?  This dish is very tasty, but didn’t seem like the tikka masala I’d had in restaurants.  It was more like a chicken cacciatore with a hint of cumin.  The kids liked it, but probably didn’t love it.

I probably will be trying the Asian Sesame Salmon next time.


**Please don’t think I’m being all elitist or anything about processed foods.  I make meals like that once in a while.  Lately with some of our family’s diet and stomach sensitivity issues, those easy-to-prepare meals are too high in sodium or other chemicals that make it tough to digest.

12. April 2011 · Comments Off on Canning 101: Or "Jam Tomorrow, Jam Yesterday, But Never Ever Jam Today!" · Categories: Uncategorized · Tags: , ,

* Name that tune!

Oh, never mind!  Here’s the whole song, just for you!  This Carol Channing act sent my sister and me into a flurry of giggle when we were little.  Prepared to have it stuck in your head for a while, ha ha!

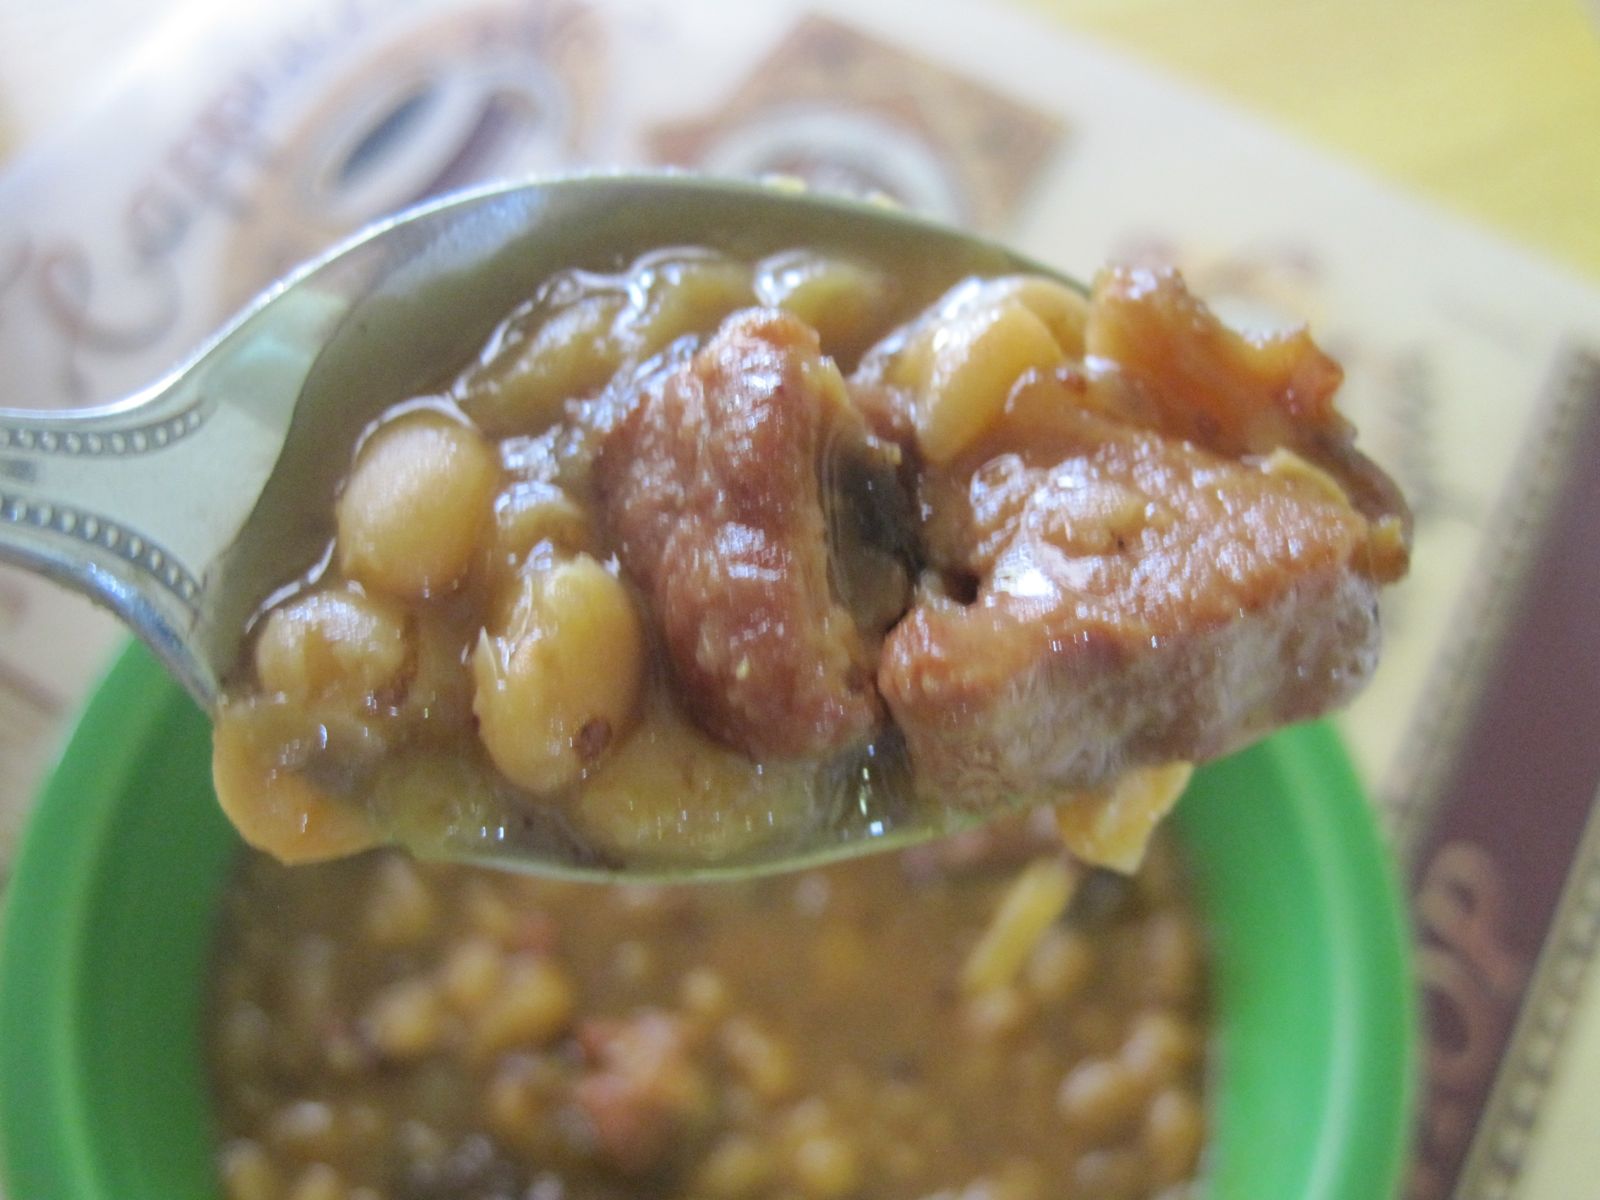
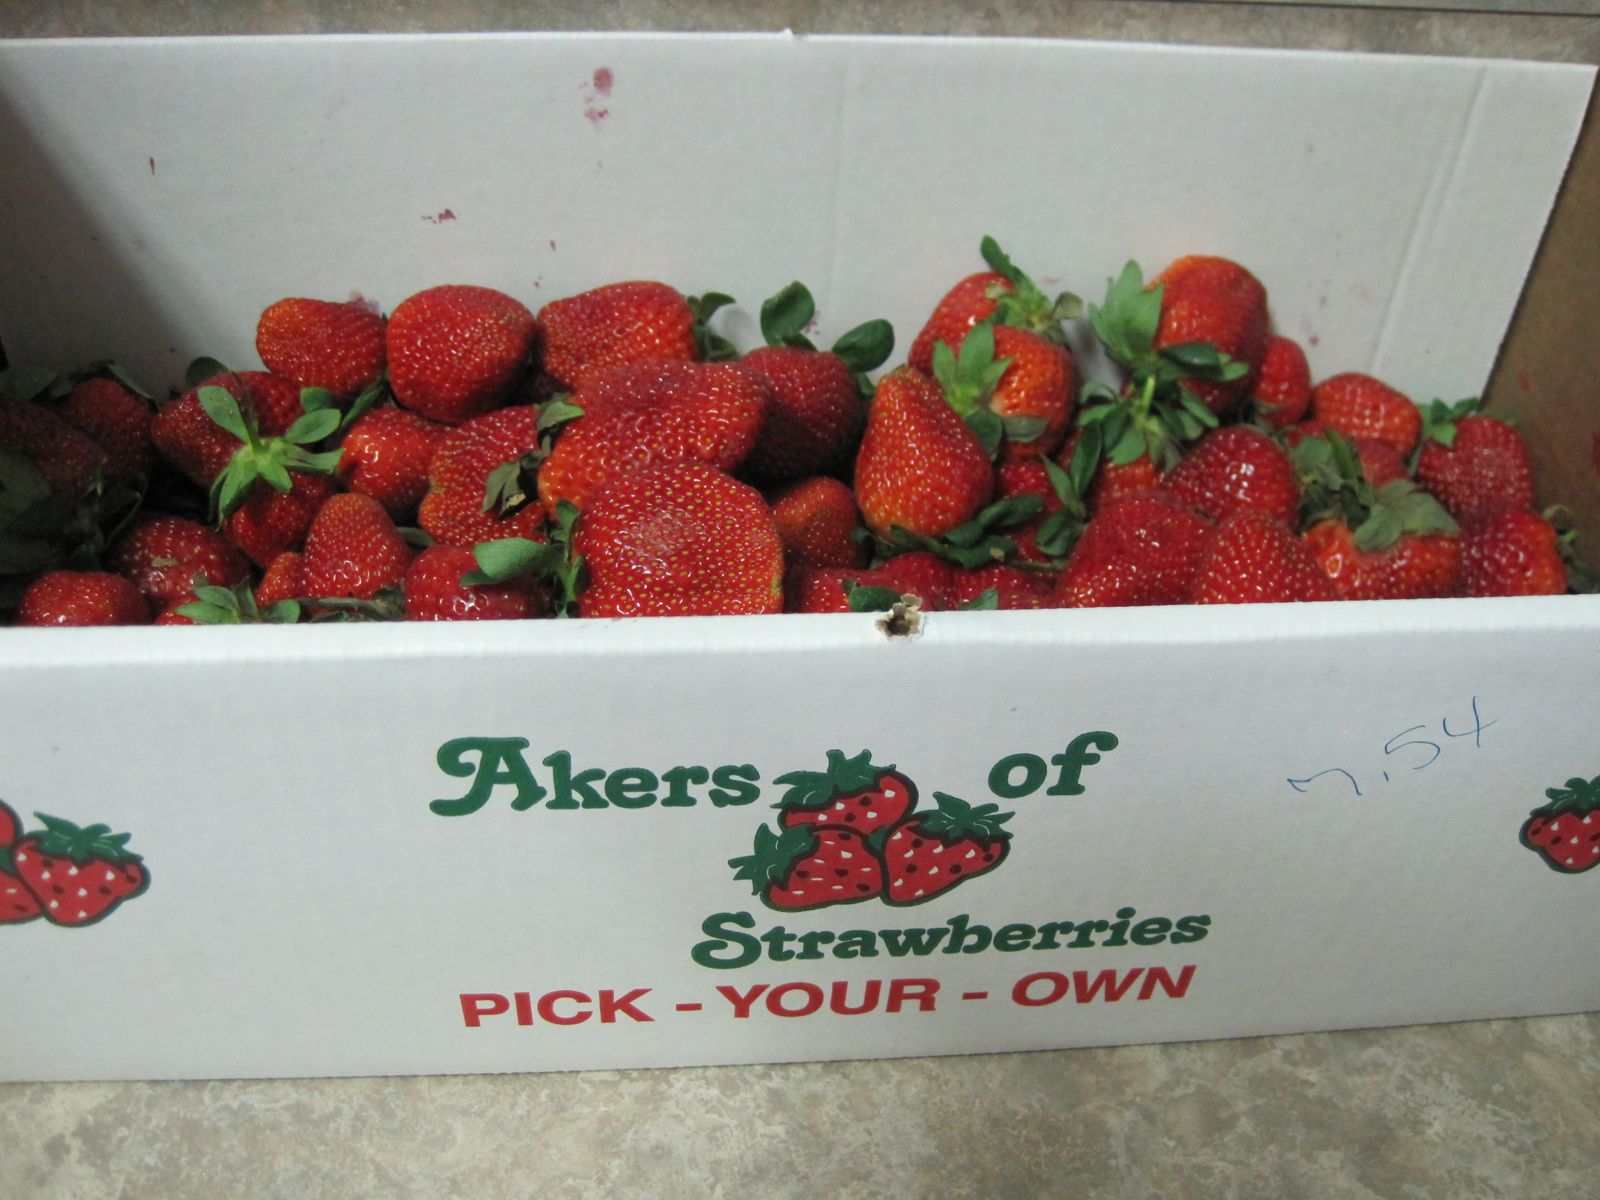
With all those strawberries I brought home on Monday, I had to get cracking to make some of the freshest strawberry jam EVER!  For the first time since 2007, I dug out my canning supplies.

“As if you don’t do enough…you do canning?”

YES!  I remember my Mom doing it when I was a kid, and it turns out canning your own food is easy, inexpensive, and incredibly nutritious!  It’s great knowing what’s in your food!

I bought my hardware in summer 2001 when we grew so many tomatoes, I was able to preserve several jars of whole tomatoes, along with several jars of homemade pasta sauce.  I’ve used it off and on in Ohio, Florida (2002-2005) and North Carolina, but then the equipment sat dormant while we were in Nebraska.

How does canning work?

Like everything else I blog about, a little science/history lesson is in order.  According to the authority on everything, Wikipedia, home canning is the process of preserving foods by putting them in jars and heating them to kill organisms that might cause the food to spoil.  I mainly stick to the easy-to-preserve foods (strawberries and tomatoes), and I’m now comfortable enough with the process that I’d like to delve into the more challenging foods soon, such as corn and peppers.

When foods have a pH of lower than 4.6, you can effectively kill the microorganisms by simply boiling the food at 212 degrees F for a specified period of time.  This is why preserving tomatoes, berries, and pickles is so easy.  And the hardware is inexpensive.

On the other hand, if you’re interested in preserving meats or low acid vegetables (such as corn and non-pickled peppers), you need to boil the food at a HIGHER temperature than is possible by simply boiling.  Perhaps you’re wondering, “How is this possible?”  Easy: you need a pressure cooker!  A pressure cooker, which allows the air pressure inside the vessel to increase as you heat it, the boiling point of the liquid can increase over 250 degrees F!  WOW, how cool is that?  Now, you can boil the canned foods at a high enough temperature to kill even the Clostridium botulinum spores, which can’t live in temperatures higher than 240 degrees!

As I’ll discuss in the next section, venturing into the pressure canning world involves a more lofty investment in a quality pressure cooker, large enough to hold the jars.

What kind of equipment do I need?  And how much will this cost me?

If nothing else right now, get this book!  Or at least a version of this book, since it’s constantly being updated.  This is the one I have from 1999.  It offers easy guidance on what equipment you need, along with dozens of canning recipes — not just for the minimally prepared foods, but also for salsas, sauces, and assorted flavors of pickles.

The rest of the supplies can easily be found at your local Walmart.  Look in the kitchenwares section…sometimes it’ll be moved to a “seasonal” section when the tomatoes and other veggies are in full harvest.  You might or might not see the supplies at other discount department stores — in this area it’s been hit or miss at my local Target (they had salsa jars, which was cool, but that was it).

This is a “canner”.  Really…it’s just a really big pot.  If you have a large soup pot, it will do the same thing for you: hold boiling water.

This “canner” includes a nifty rack that helps you easily lift all the jars out of the pot at once.  This will hold seven jars.

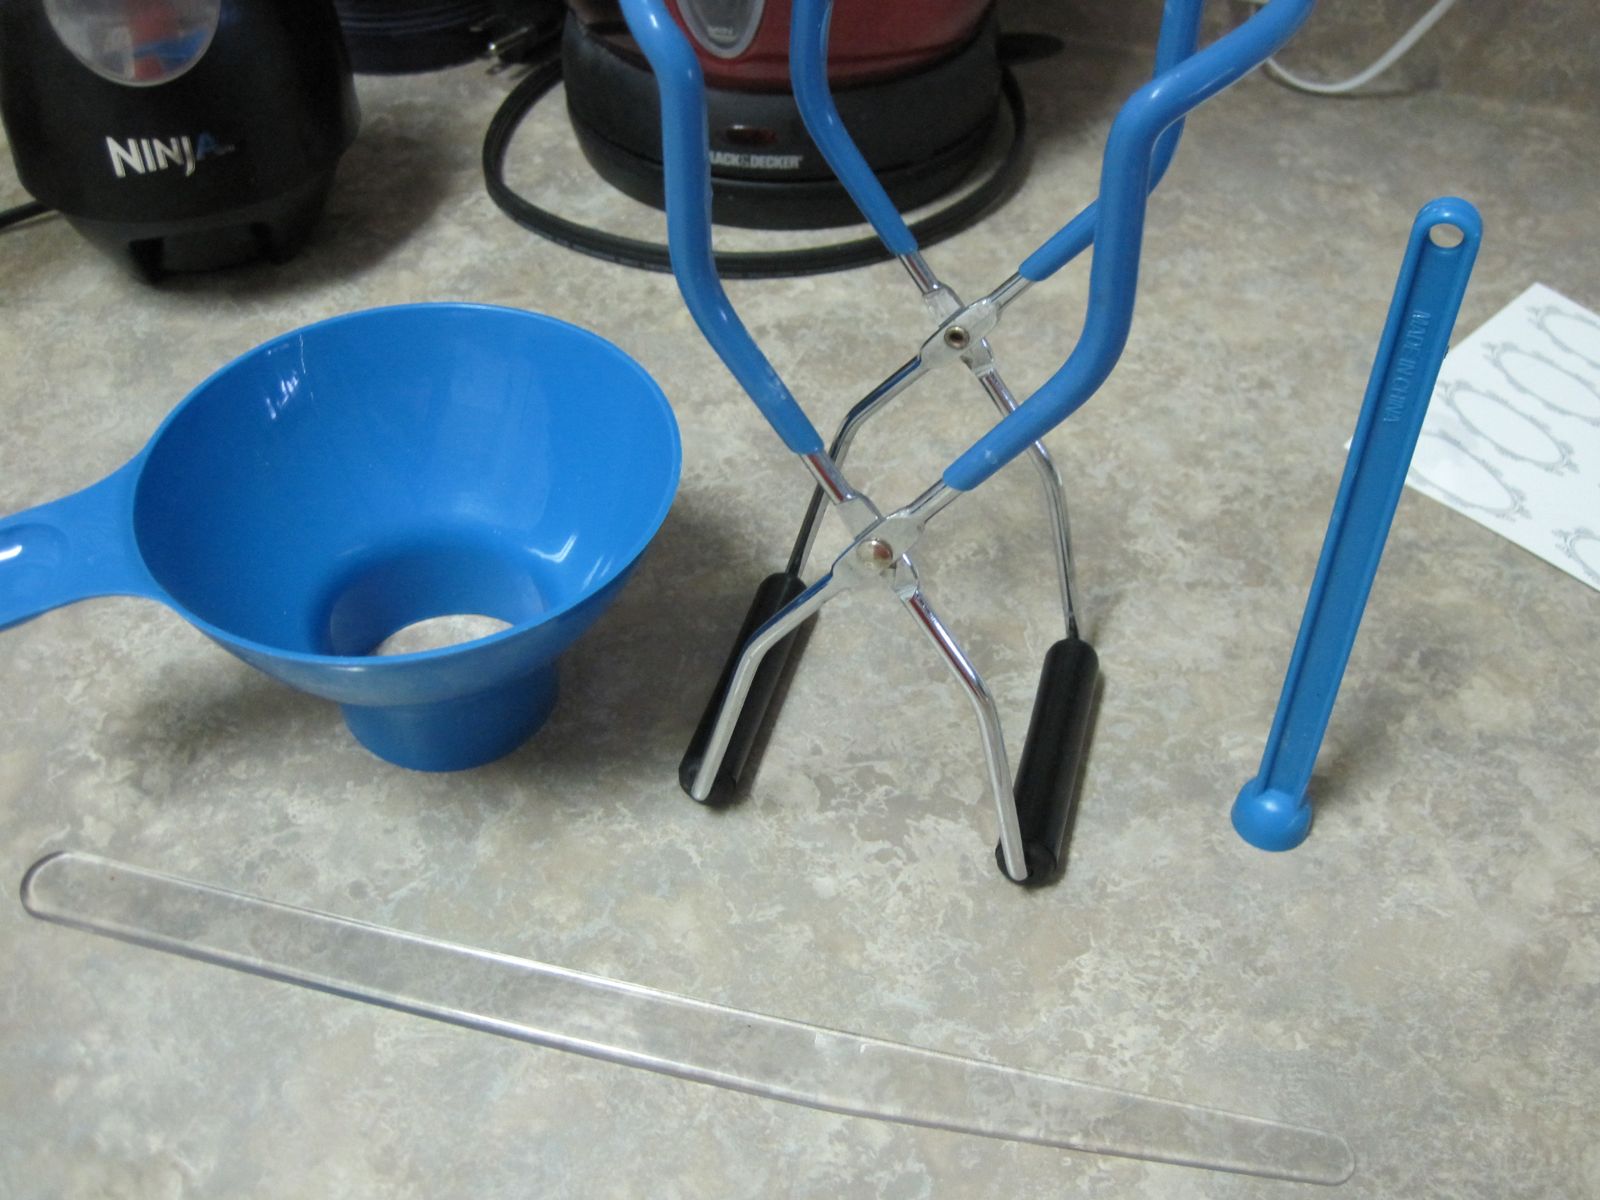
I also got this “accessory pack”.  Over the years, I’ve come to only use the tongs and the funnel.  And honestly, I don’t even use the tongs all the time.  But the funnel is a lifesaver — and can be purchased separately for just $1-2!

$6.97 at your local discount department store.
My 11-year-old accessory set.

Jars, Lids and Bands.  For me this is the only recurring expense with canning…this is because I give away so many of my jams.  I lean towards the “quilted jelly jars”, which are half-pint (8 oz.) sizes, for jams and jellies.  You can get a dozen for about $9-10 at your local discount department store.  For my tomato products I look for the “wide mouth” quart-sized jars.  They take special lids and bands, but aren’t that hard to find.

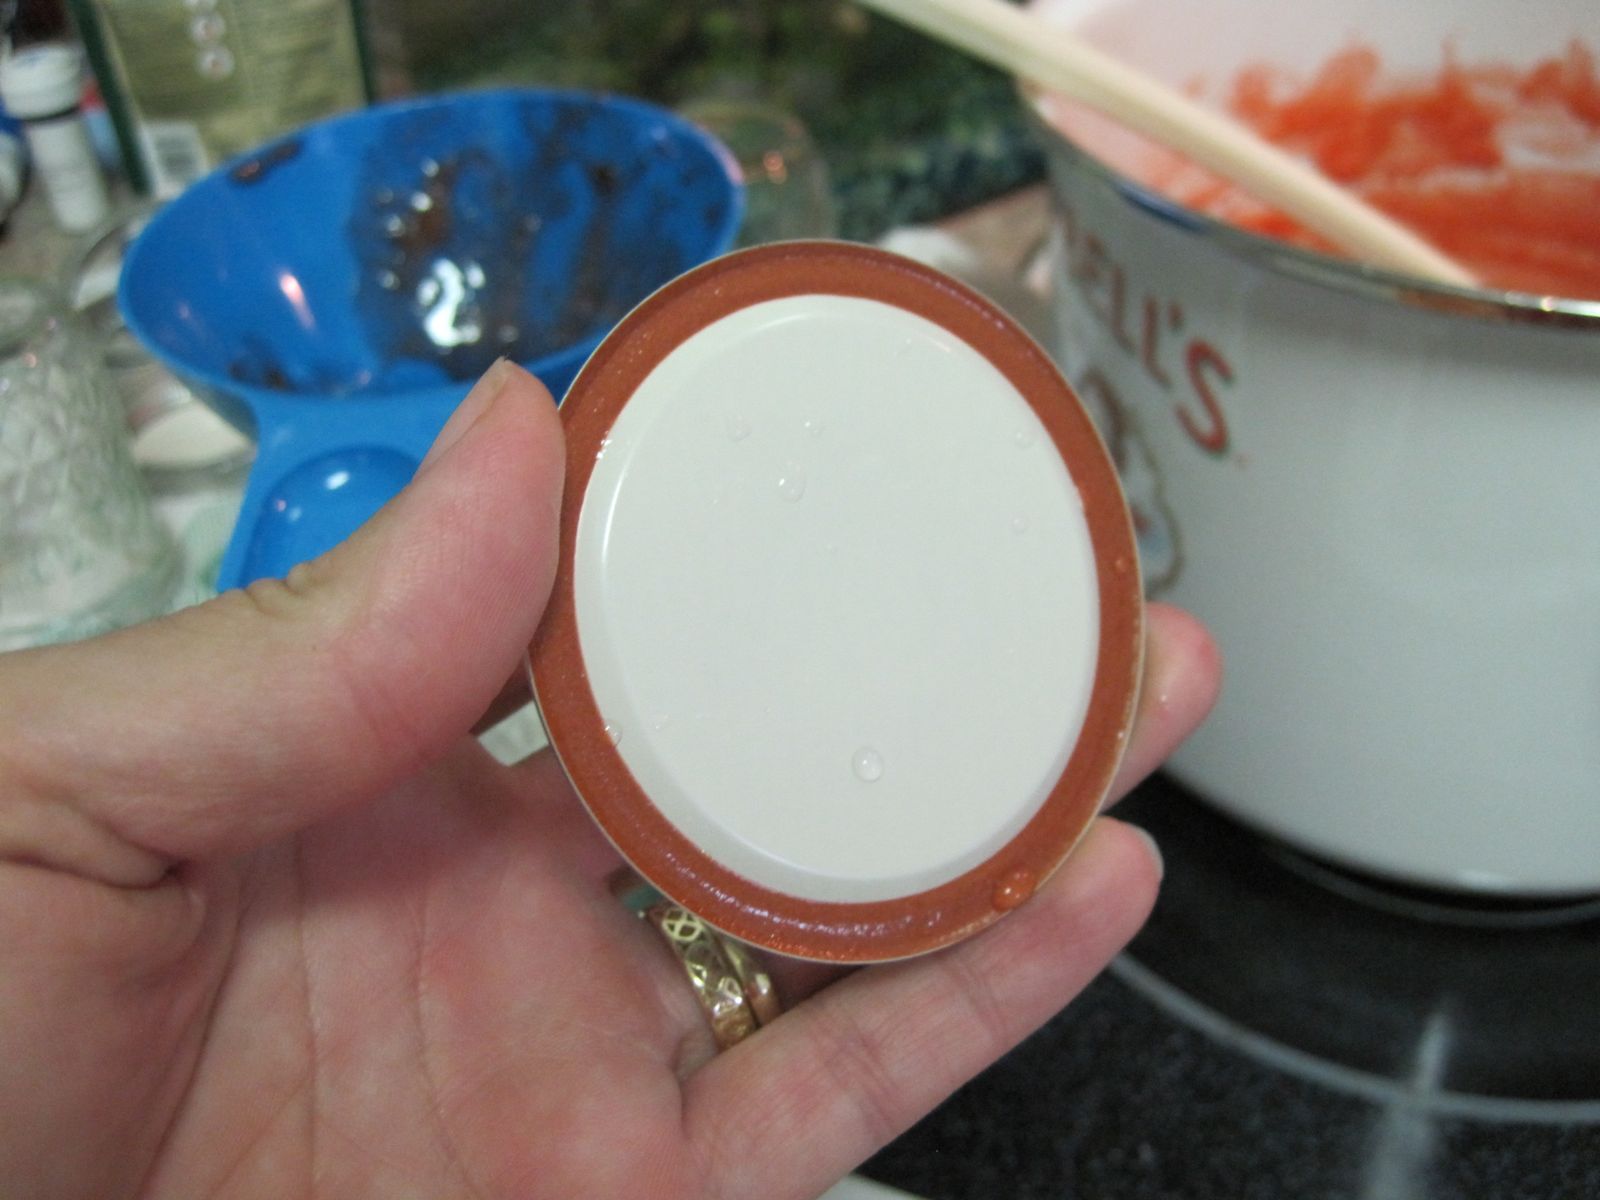
Some terminology.  The “lid” is the solid round disc with the rubber gasket on the bottom.  The “band” is the threaded ring that really is only needed to hold the lid in place until it’s been vacuum sealed.  Some folks will remove the band before storage, but I prefer to keep it with the jar, helps to hold the unsealed lid on the jar when you’re storing it in the fridge.

Know that if you keep your jars, you can reuse them with the bands, and you simply need to buy new lids for $1-2 per dozen.

These lids have a special rubberized gasket that will form the seal on your jars.  They can only be used once, but the jars and bands can be used multiple times.

And finally, you’ll need the fruits or vegetables you’re planning to preserve.  If you’re making jam or jelly, you’ll want to buy some pectin, which is also found with the canning supplies at your local discount department store.  Pectin is a type of polysaccharide found in plants.  This is the ingredient that gels together jams and jellies, and is also found in natural intestinal remedies, such as fiber laxatives and stool softeners.

So let’s tally up the expenses for canning your own food:

  1. “Canner” or other large pot: $20
  2. Accessories: $7
  3. Jars, Lids, Bands: $10 per dozen
  4. Pectin: $1-2 per recipe’s worth
  5. The cost of whatever food you’re planning to preserve.
I’d say that for about $50 of up front cost, the cost of my family going out to dinner at Outback Steakhouse, you could lay the foundation for preserving foods with little-to-no chemicals.
OR: You could just hit this “Easy Button” here, which will hook you up for less than $45!

Canning 101: Classic Strawberry Jam

So imagine tapping into some fresh fruit or vegetables that were preserved a mere SIX hours after picking them off the plant!  And that you know EXACTLY what’s in the jar.

In this case, I know that this strawberry jam has only strawberries, sugar and pectin.  Of course, this recipe I’m going to demonstrate has 7 cups of sugar in the 9 half-pints of jam, so it’s definitely NOT a low-calorie food.  I’m only attesting that it’s nice to know exactly what’s in the jar.

(Two days later I made jam with half the sugar — which required a different kind of pectin that promotes more gelling — but I haven’t tasted it).

So here we go.  Let’s start with our stash of strawberries.

No…wait.  Start with the canner pot, make sure it’s filled up about 2/3 full with water and get it boiling.  It’s a large pot and you won’t want to wait for that water to boil once the jars are ready to process.

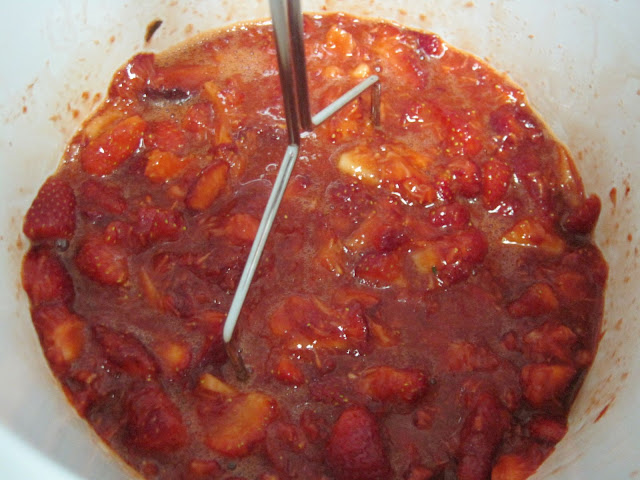
Back to the berries.  Crush the berries. I have a potato masher with which I can do this.  Looks like serious strawberry carnage here, doesn’t it?

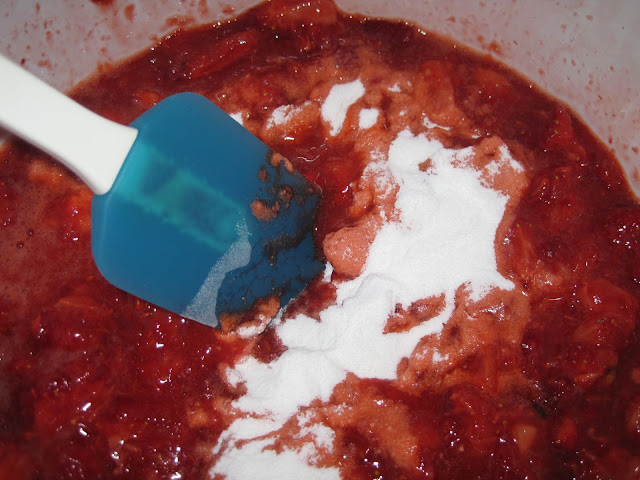
Put the pot on high heat and bring to a boil. If you’re using traditional pectin, just put in the contents of the box with the sugar called for in the recipe. In this recipe, it’s asking for SEVEN cups of sugar (oofta!). If you’re using “low sugar” or “sugar free” pectin, read the instructions about the possible additional ingredients to be added at this point.

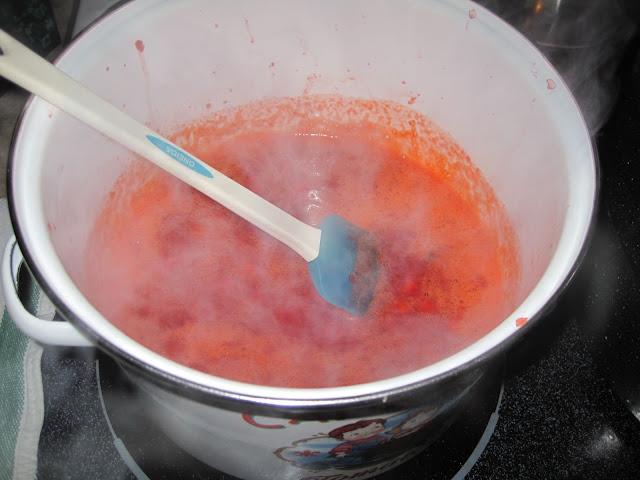
Allow this to boil vigorously for the amount of time in the instructions. In this case, we boiled for about 5 minutes, and this allowed the pectin to gel. You might want to use this time to get your ladle, funnel, clean jars, bands and lids ready near the pot.

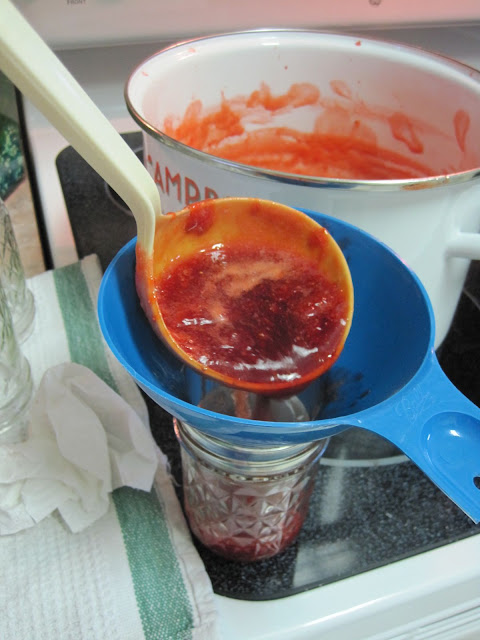
You need to work quickly at this point. Fill each jar with the jam to within 1/4-1/2″ of the top of the jar. DO NOT FILL TO THE VERY TOP! You need the space to account for possible expansion of the jam while you’re boiling the jars, as explained in this link.

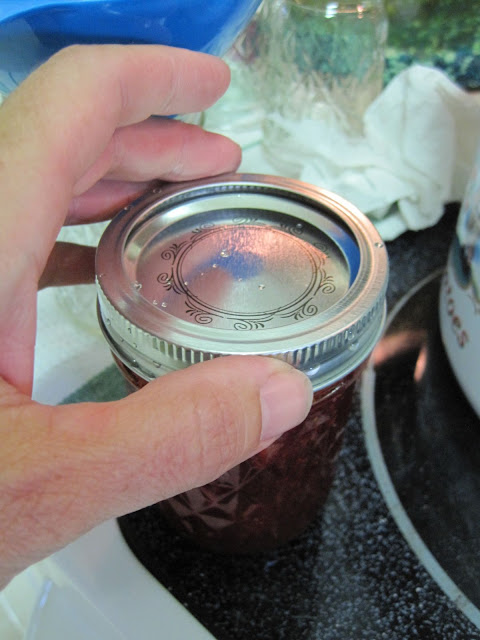
Make sure the top edge is clean, then place a lid on top.

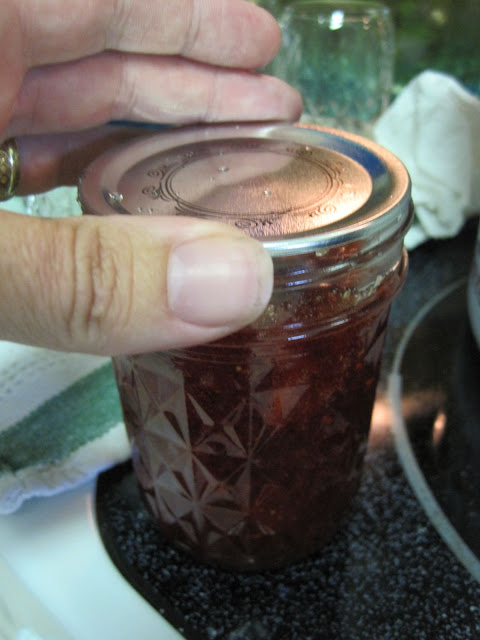
Follow it with a band, which doesn’t need to be closed super-tightly. Just tight enough that the lid won’t slide off. That tightness will loosen up while you’re processing the jars.

Now it’s time to get the jars into the canner, whose water should be boiling already.  I use a rack that makes it easy to lower/raise up to 7 jars.

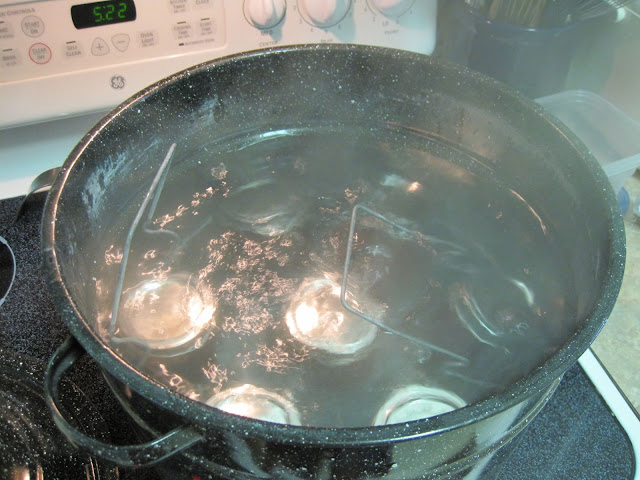
After the requisite number of minutes of boiling (15 minutes in the case of the strawberry jam), pull out the jars and let them dry off/cool on a towel. Listen for the pop — that’s the sound of the lid “imploding”. You want to hear this pop once for each of the jars you have, it’s the proof that a vacuum seal was indeed formed and your jams are good to go for up to 12 months in the cupboard!

If you don’t hear the pop, and there’s still a flexing of the lid when you press down on it, then your jam isn’t sealed. In most cases, you can simply re-boil the jar again and try for that seal. If that doesn’t work, then pop it in the fridge where it’ll last you 7-10 days.

The finished product. Some might suggest you cool the jars upside-down, to help the berries distribute better throughout the jar. I didn’t do that here, so the berries sorta drifted up towards the top.

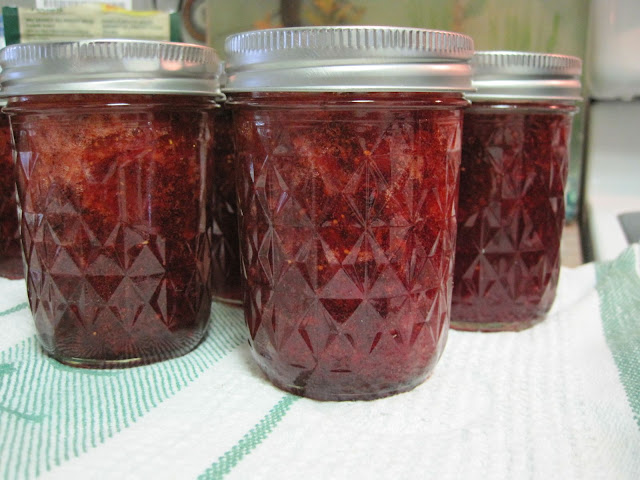
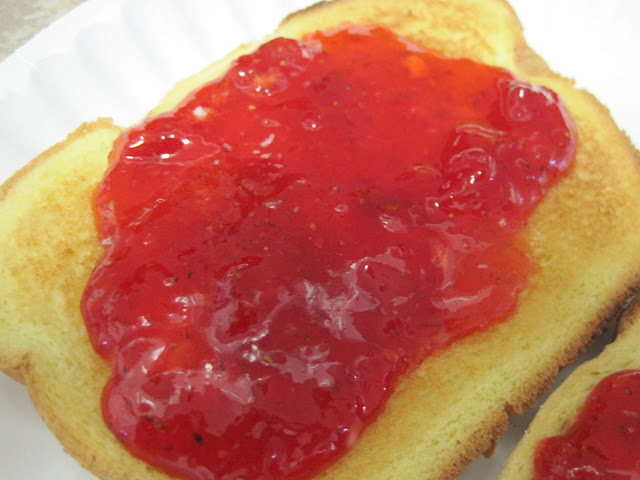
Recipes claim that you should let the jars sit for 24 hours before using, but I don’t see why. Warm jam on some toast (in this case, potato bread toast)! YUM!